Reviews
Reviewing products, applications and ideas
Arrived in the mail ...
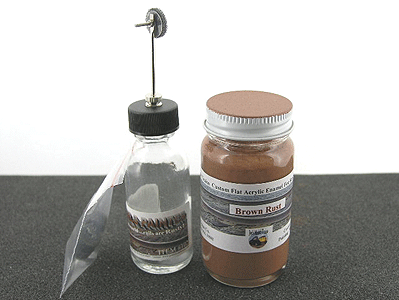
We have now received both the Rusty Rails Painter and the Weathering System. Over the next few days we will be reviewing these products.
Reviews on the way ...
We will be reviewing the Weathering System by Bragdon Enterprises and the Rusty Rails Painter by Joe's Model Trains. Both products have been ordered and we are awaiting their arrival later this week. So check back for a review of both of these systems.
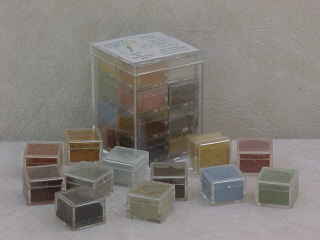
Latex Rubber Rock Molds by Bragdon Enterprises
The resin casting is very similar to the foam, which is reviewed following this. To start casting rock formations ensure you have a clean area, you might want to put down newspaper to catch and drips or overages, then “READ THE DIRECTIONS all the way through first” don’t try to follow them as you work through it for the first time or you will waste materials. First have a “Plan”, know where you want to cover areas with the castings. You can make random pieces but it is much easier to know what you plan to cover. You will need to cover the entire area of the mold you are going to use with petroleum jelly (thin layer is plenty, don’t over due it will effect the casting) rub a fine film into every crack, crevice and corner, this is your release agent I chose to use rubber gloves and 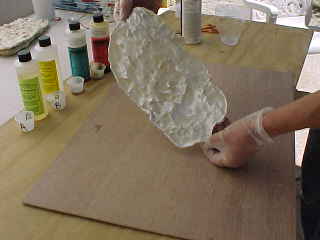 used my fingertips to spread it out. Once that is done use white enamel spray paint (cheap paint works) to cover the area you just covered with the petroleum. Where I failed first was I didn’t follow the directions close enough (that’s why I stress that). I didn’t pour out the first layer THIN again I mean thin, this resin runs very easily in the beginning and pools in the low spots. Tap it on the work surface to draw out bubbles. The directions will save you material and time; I easily wasted 8 oz of
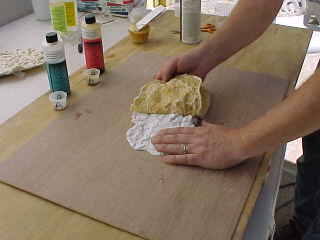 resin the first day. If you pour it thick it becomes too stiff to work and you will have weak or blank spots and when you place the piece that may break or crack. You need to spread it out thinly, as it sets up (don’t wait till it changes to opaque or thickens) use a disposable brush or cardboard with fine finger like cuts on the end. Once spread out and lightly thickening flip it over hold it up over the news paper to allow the material to run to the now low points that were the high point on the molds when they were lying upright. Try to limit how much you use to only one ounce of each part at a time, cast small areas at one time this will also help with placement. With
 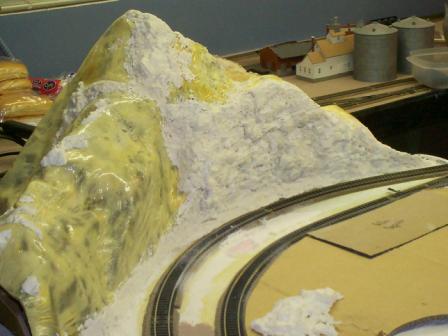 well feathered edges you can overlap with nearly seamless edges. Multiple resin layers are OK and you can also use the foam mix from the previous review to back it without screen though. The demo taught me to use different areas of the larger mold to cast similar rock styles. By moving just a bit, each casting will be different and with over lapping the casting areas it will limit repetitive patterns. You can take a 12” X 18” mold and easily cast 28” X 40” worth of rock with good placement. Once we placed and glued (we preferred a low temp hot glue gun, oh yea use gloves! Trust me)
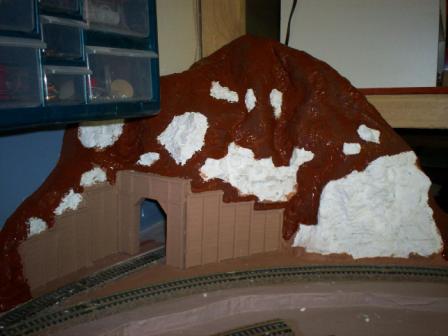
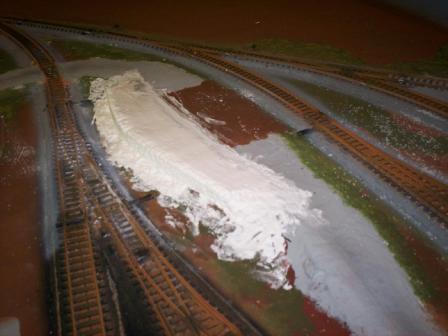 all the pieces we used sculpta-mold (see Tips and tricks) rather than silicone because of cost $$ and I had a lot of gaps to start. The Sculpta-Mold also takes color really well. For primer we went with white Gesso primer and I did a bit over the required because it was more visually appealing to me to see everything one color to start, if you look at the gallery “Strawberry Mountain you can see rock placement and the foam un-primed. I primed the whole mountain (not required) but you definitely
  need to primer the resin to ensure weathering works. To cast stacked rock or brick similar to what retaining walls are made from, the process is close, follow the set-up the same, the difference starts when you mix the resin, use a bit more because you want this a little thicker casting. Tap or lightly drop the mold on the work surface to draw out bubbles but you won’t need to flip it because most bricks are relatively even. You want to ensure the m
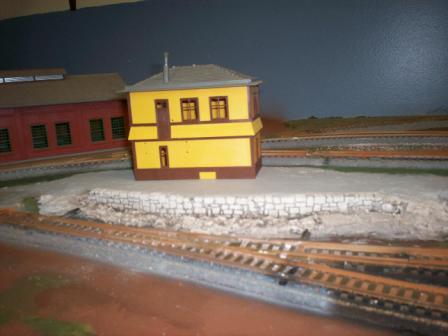 old lays flat or the thickness will be different from one side to the other and depending on the placement you won’t need a backing of foam. I also placed a brick casting as a retaining wall in the layout (check the gallery “Interlocking Tower Retaining Wall # 2”). The finishing is personal preference (colors and weathering). I can honestly say their web site and directions are 100% accurate and helpful, they don’t talk over my head and if you get a chance to see a demo take the trip the time is well worth it.
Geodesic Foam by Bragdon Enterprises
The first of our reviews will be of the Geodesic Foam of Bragdon Enterprises. We had attended a model railroad show in the area and sat in on a presentation done by the owner, Joel Bragdon. As we were just beginning to dip our toes in the hobby our eyes light up with the possible ease of use and finished product using this system. Their website is www.bragdonent.com and their products include much more than the Geodesic Foam and we are looking forward in using the different items offered by Bragdon Enterprises. Read our review of the Geodesic Foam system below.
We were at a model train show at a nearby fair ground last year absorbing everything we could and hunting for that best white elephant possible to ensure all the money spent would go over easier with the wives. We sat d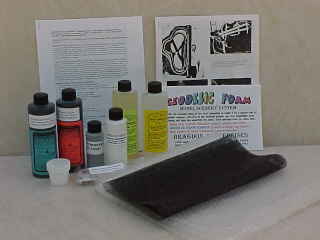 own to watch Joel Bragdon of Bragdon Enterprises (www.bragdonent.com) give a very energetic demonstration of a Geodesic foam kit from Bragdon Enterprises. Even before the demonstration we looked at the booth that was set up. Looking at the small 2’ X 2’ stand with a steep angled hill side with rock and soil, colored very well at one corner of the table, which was unbelievably realistic was something that pulled us to the demonstration but we also thought to our selves that is not something we are ready for. Our minds were changed as soon as the demonstration began. We sat down and inside a ½ hour we learned more than we did the entire year before that day! The demo started with a brief explanation “use what ever structure you want” it doesn’t matter too much what this product goes over! Then with that said Joel went to work on the demonstration of the foam and resin casting. I was hooked from the start, fast easy and realistic. One draw back, initial cost was high but the molds are sturdy and can be adjusted to fit any area. Even with that cost, the time and effort saved and the look of the finished product did cover the initial costs quite quickly.

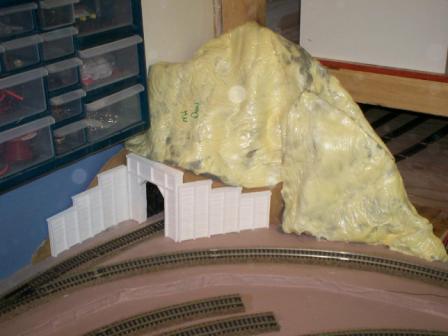
The Geodesic Foam is a simple two part mix 1:1 stir and pour, it is time critical so ensure everything is ready. Make sure that you “READ THE DIRECTIONS” all the way through first and don’t try to follow them as you work through it for the first time or you will waste materials. First have a “Plan”, know where  you want to cover frame work and estimate the size of screen by placing it over the area. To start lay out plastic wrap with no gaps as flat as possible, we used about two to three inches of overlap, (use name brand plastic wrap, the cheap stuff doesn’t stand up) then two layers of fiberglass window screen (the thin cheap stuff works fine, they also suggest bubble wrap, but I prefer screen)
  mix your two foam parts “A&B” as directed in a disposable cup (NOT Styrofoam or wax covered cup) and be careful the mix does heat up and expands (we chose Dixie cups because the plastic seems thicker) They suggest using cardboard for stirring and spreading, we had problems with the cardboard bending up but folded a piece length wise and that helped stiffen it. Try to spread it out over the screen as evenly as possible because it will expand a lot more in thicker areas, once spread out put plastic wrap over the top as was done in the beginning. And place it over the frame work you want to cover this will allow it to conform to that area easier. This is why you have plastic wrap over both sides and a healthy overlap. Don’t worry about it hardening, you can use a heat gun to make it pliable again if you want to make adjustments. We have re-heated it months later and it still bends, however the first few hours are much easier and require less work. Once it hardens and you are happy with the looks you can use there resin casting and molds to make rock, brick, etcetera.
So in conclusion would we recommend this product? Most definitely, with ease of use, flexibility in application and finished product, as not only have we seen impressive results, just the process of using the shell gave us different way to look at the existing layout and how to improve structure and design as we built. We do want to give thanks to Joel for both the wonderful product but also allowing us to do our own personal review of their Geodesic Foam. We will follow up this review with a review of the rock molds and resin casting system so check back soon.
Online Trains

Not only will we review products and processes but we feel it is important to review the businesses that help us as we model. By far one that has shown us much support both in product and knowledge but in also saving our bank accounts. We all know that the hobby can be not the least expensive of hobbies so it is important to find good value in what we purchase. We are lucky to have Online trains a short drive away so that we can visit the store in person but they also offer purchases online. The owner, Rob, in our opinion is a cornerstone in the area for giving modelers the means and resources needed to accomplish what we strive for. I have yet to find another place that offers items at the price that Online Trains does. Click on the logo above to view Online Trains website. It is well worth the visit to either the store or the website. Thank Rob and all of you at Online Trains.