


 |
Somerset & Dorset Joint Railway Corfe Mullen Junction and Corfe Mullen Halt and Corfe Mullen Siding |
|
||||||||||
|
||||||||||||
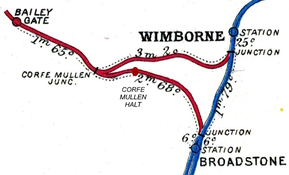
Corfe Mullen Junction was located at the southern end of the 'main line' of the Somerset & Dorset Joint Railway (S&DJR) at the divergence of the routes to Wimborne and Broadstone, both of which stations were on the line of the London & South Western Railway (L&SWR) from Southampton to Dorchester via Ringwood. Apart from a level-crossing, crossing-keeper's house and signal-box this location was simply a railway junction, without any passenger or goods facilities. For some years there was a small Corfe Mullen Halt located about a mile south of the junction on the line to Broadstone, but this halt was not opened until 1928 and it was closed in 1956.
 |
 |
|
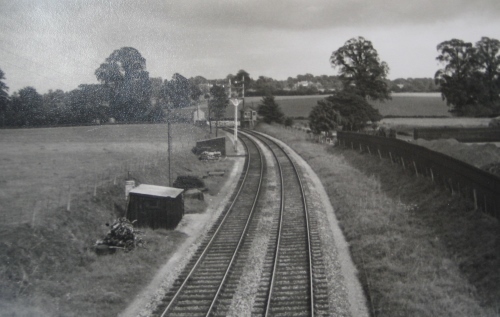
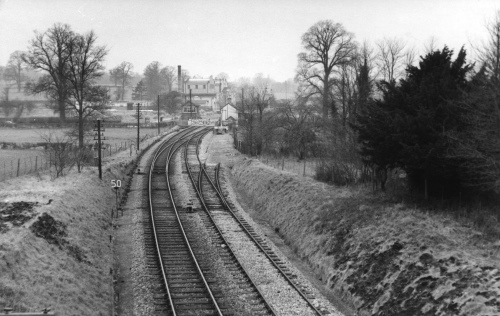
| Looking down the line at Corfe Mullen in 1957 | Looking up the line at Corfe Mullen in 1962 |
The southern part of the S&DJR had been constructed originally by the Dorset Central Railway (DCR) as a single-track line running northwards from Wimborne Junction to Blandford. The first station north of Wimborne was at Bailey Gate and between those two stations there were three manned level-crossings:- Lake Crossing, Corfe Mullen Crossing and Bailey Gate Crossing. All three crossings were provided with resident crossing-keepers and some form of signalling, although only the latter two are believed to have had actual gate boxes. Bailey Gate station itself was the first block-post and passing-loop up the DCR line from Wimborne Junction.
 S&DJR trains originally had to reverse at Wimborne in order to run over the
L&SWR to Bournemouth, which became an increasing hindrance with the growth of
through traffic from Bath and the North to the south coast. To ease this problem
a new 'cut-off' line was constructed eventually, which left the S&DJR route at Corfe Mullen
(just east of the level-crossing) and ran south-eastwards to rejoin the L&SWR
at Broadstone. Known officially as
the 'Poole & Bournemouth Junction Railway', the new line
was brought into use for goods traffic on 14-December-1885, but reportedly did
not open for passenger traffic until 1-November-1886 (see also Note below).
Although the actual divergence from the original DCR route was at Corfe Mullen
there was no physical junction there initially; instead the Wimborne and
Broadstone lines continued north-westwards as separate parallel single-lines as far as
Bailey Gate station, where the actual junction was made. The new line was the first section of the
S&DJR to be worked by the Electric Train
Tablet (ETT) method (using Tyer's No 1
ETT instruments), which subsequently was introduced on the original DCR line on 4-November-1886.
S&DJR trains originally had to reverse at Wimborne in order to run over the
L&SWR to Bournemouth, which became an increasing hindrance with the growth of
through traffic from Bath and the North to the south coast. To ease this problem
a new 'cut-off' line was constructed eventually, which left the S&DJR route at Corfe Mullen
(just east of the level-crossing) and ran south-eastwards to rejoin the L&SWR
at Broadstone. Known officially as
the 'Poole & Bournemouth Junction Railway', the new line
was brought into use for goods traffic on 14-December-1885, but reportedly did
not open for passenger traffic until 1-November-1886 (see also Note below).
Although the actual divergence from the original DCR route was at Corfe Mullen
there was no physical junction there initially; instead the Wimborne and
Broadstone lines continued north-westwards as separate parallel single-lines as far as
Bailey Gate station, where the actual junction was made. The new line was the first section of the
S&DJR to be worked by the Electric Train
Tablet (ETT) method (using Tyer's No 1
ETT instruments), which subsequently was introduced on the original DCR line on 4-November-1886.
[Note: the new line has been labelled variously as the 'Broadstone cut-off', the 'Corfe Mullen cut-off' or the 'Wimborne cut-off' by different historians. It could argued that the Wimborne epithet is the most appropriate, given that the line 'cut off' that part of the original route which went via Wimborne, but equally the Broadstone epithet could be used to describe a line which 'cut off' from the original route to go towards Broadstone. More information about the initial 1885-86 period of operation on the 'cut-off' can be found here in the RailWest page about Bailey Gate station.]
Very little is known about the original signalling arrangements at Corfe Mullen Crossing, in the days when it was simply a level-crossing on the single-line between Bailey Gate and Wimborne Junction, but it is possible that the arrangements were similar to the simple installation provided at Lake Crossing. When the new 'cut-off' line to Broadstone was opened in 1885 the routes of the old and new lines converged a short distance south of Corfe Mullen Crossing, but with no physical junction between them, and then continued northwards to Bailey Gate as two parallel single-lines. It is possible that a proper 'crossing box' with an interlocked lever-frame may have been provided at the level-crossing at that time, but whether that would have been a ground-level hut or an elevated structure similar to the box at Bailey Gate Crossing is unknown.
The crossing-keeper's house was on the Down side of the line on the Wimborne (east) side of the road. The 1888 OS map marks a 'signal box' on the Down side of the line at the Wimborne end of the crossing-keeper's house, whereas on the later 1901 map it is shown on the Up side of the line opposite the house. Although the crossing box now needed to control trains in both directions on two lines rather than one, it is possible that only one set of Distant and Home signals were provided for each direction; as their purpose was merely to indicate to approaching trains whether the gates were open for rail traffic or not, then in each direction one set of signals could have applied to both lines. Map evidence would suggest also that the 'bridge indicators' at Brog Street (see below) were in place by 1887, so one may presume that these were operated by the crossing-box as well.
Local instructions for Corfe Mullen crossing appear in various surviving editions of the S&DJR Working Timetable (WTT) Appendix for the period 1886-1905. (Click here to read the instructions from the 1889 edition.) From these it is clear that the gates at the crossing were kept normally across the road with all the signals 'off', and would be opened by the crossing-keeper as required for road traffic and subject to the state of any rail traffic. It was the task of the signalman at Bailey Gate to inform the Corfe Mullen crossing-keeper of the approach of any Up or Down train on either line by means of the appropriate bell-code, which had to be acknowledged by repetition. |
|
|||||||||||||
In the early 1900s the S&DJR examined various ways to increase the capacity of their line south of Templecombe Junction, of which one result was the opening of a new passing-loop at Stourpaine in 1905. Minute 5603 of the Officers' Meeting on 25-April-1904 recorded a suggestion that, with the provision at Corfe Mullen of a new physical junction between the two existing independent single-lines, the section between Bailey Gate station and Corfe Mullen could be converted to double-line working and at the next Meeting on 18-July-1904 (Minute 5633) it was agreed to recommend that work at an estimated cost of £1,693.
The construction of the new junction included the provision of a new CORFE MULLEN JUNCTION signal-box, which replaced the original 'gate box'. It unfortunate that no known S&DJR Signal Instruction exists in relation to this change, so it is unclear to what extent - if any - there may have been some preparatory alterations to the signalling at Corfe Mullen, nor is there a known formal record of the actual opening date of the new signal-box. However Cooke [3] quotes 16-April-1905 and there is no firm evidence to the contrary (see Note below). The original junction at Bailey Gate was removed and thereafter the line from Bailey Gate to Corfe Mullen Junction was worked as ordinary double-track and controlled by standard S&DJR block telegraph, while the two single-lines from Corfe Mullen Junction to Broadstone and Wimborne Junction were worked by Tyers No 1 ETT (presumably using existing ETT instruments relocated from Bailey Gate).
[Note: Lucking [1], when writing about the doubling from Blandford to Bailey Gate in 1901, said that "...Bailey Gate to Corfe Mullen followed on 16th February 1902.." and attributed that date to Barrie & Clinker [2], but their source is unknown and the available contemporary evidence does not support a 1902 date. The S&DJR wrote to the Board of Trade (BoT) on 4-April-1905 to say that a new junction had been constructed and the BoT replied next day to authorise its use pending a subsequent inspection. Cooke [3] quotes 16-April-1905 and his source was updates to the relevant Midland Railway Distance Diagrams. The Western Gazette edition of 28-April-1905 included a brief report on the opening of the new junction, but did not quote a specific date. It would seem a reasonable presumption therefore that the formal opening date was some time between 6th and 27th April 1905.]
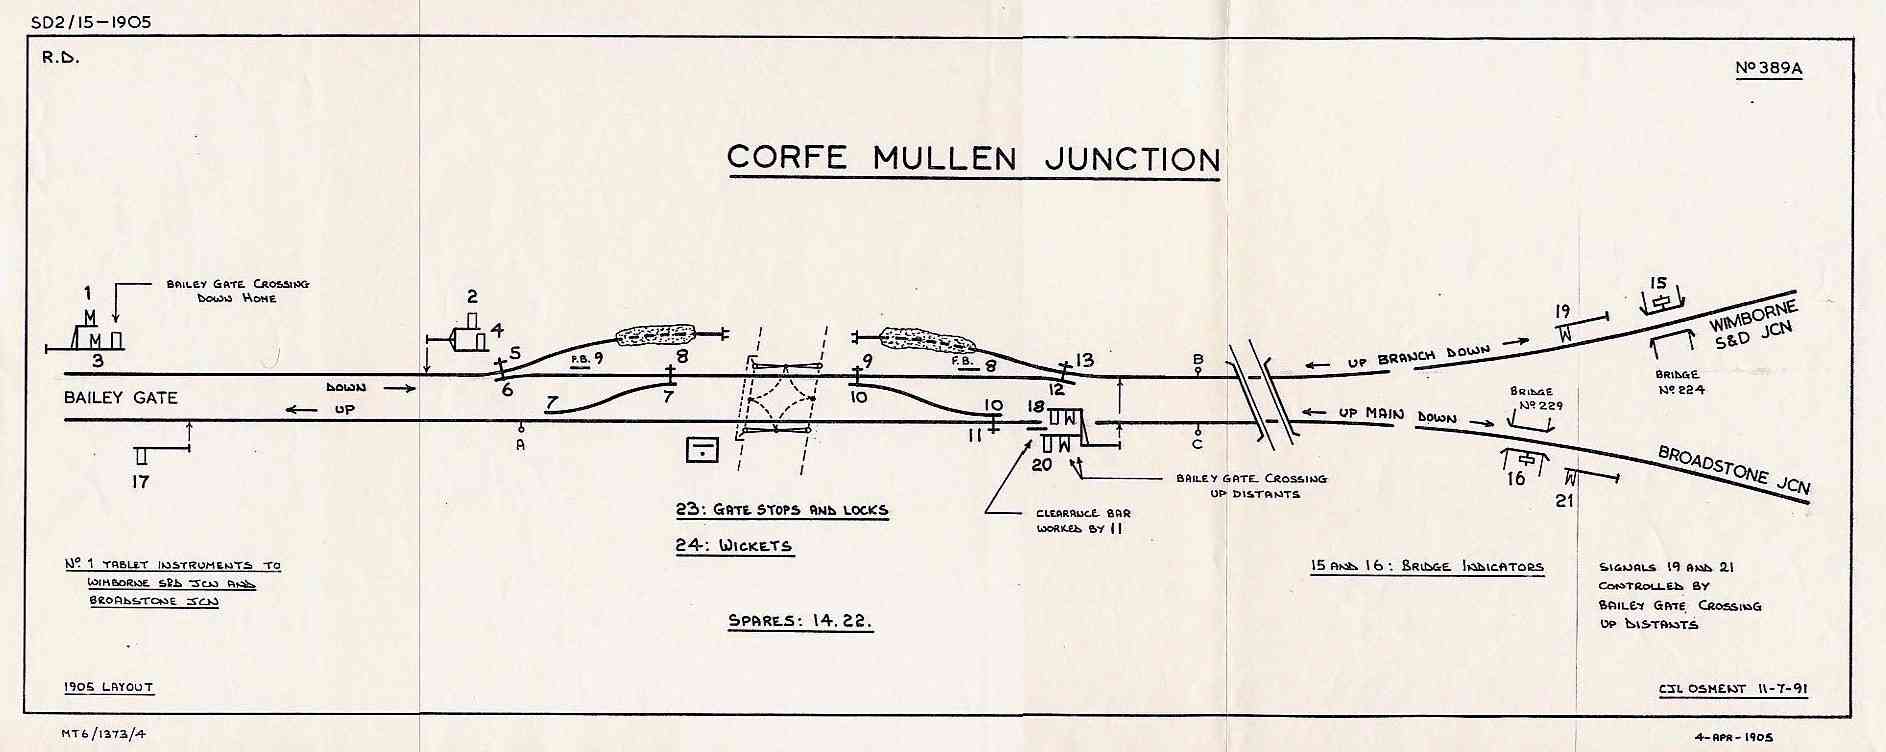
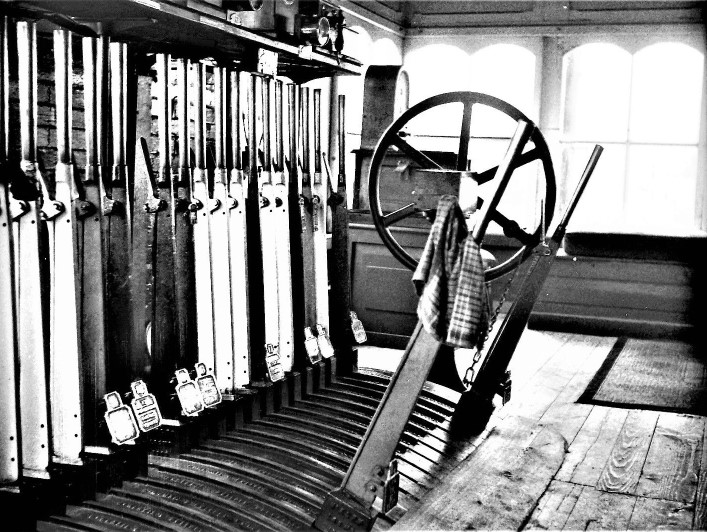
The new signal-box was inspected for the Board of Trade (BoT) by Major Pringle on 29-June-1905 (National Archives file MT6/1373/4). It was a S&DJR TYPE 3 (similar to the L&SWR TYPE 4) brick box with a gable roof, containing a 24-lever interlocking frame and a wheel to operate the level-crossing gates; the lever-frame was of the Stevens & Sons pattern with levers at 4.1/8" centres, but it had been manufactured by McKenzie & Holland of Worcester. The box was located on the Up side of the line, on the Bailey Gate (west) side of the road, diagonally across the level-crossing from the crossing-keeper's house. The diagram below shows the layout at the time of opening:-
 |
 |
 |
||
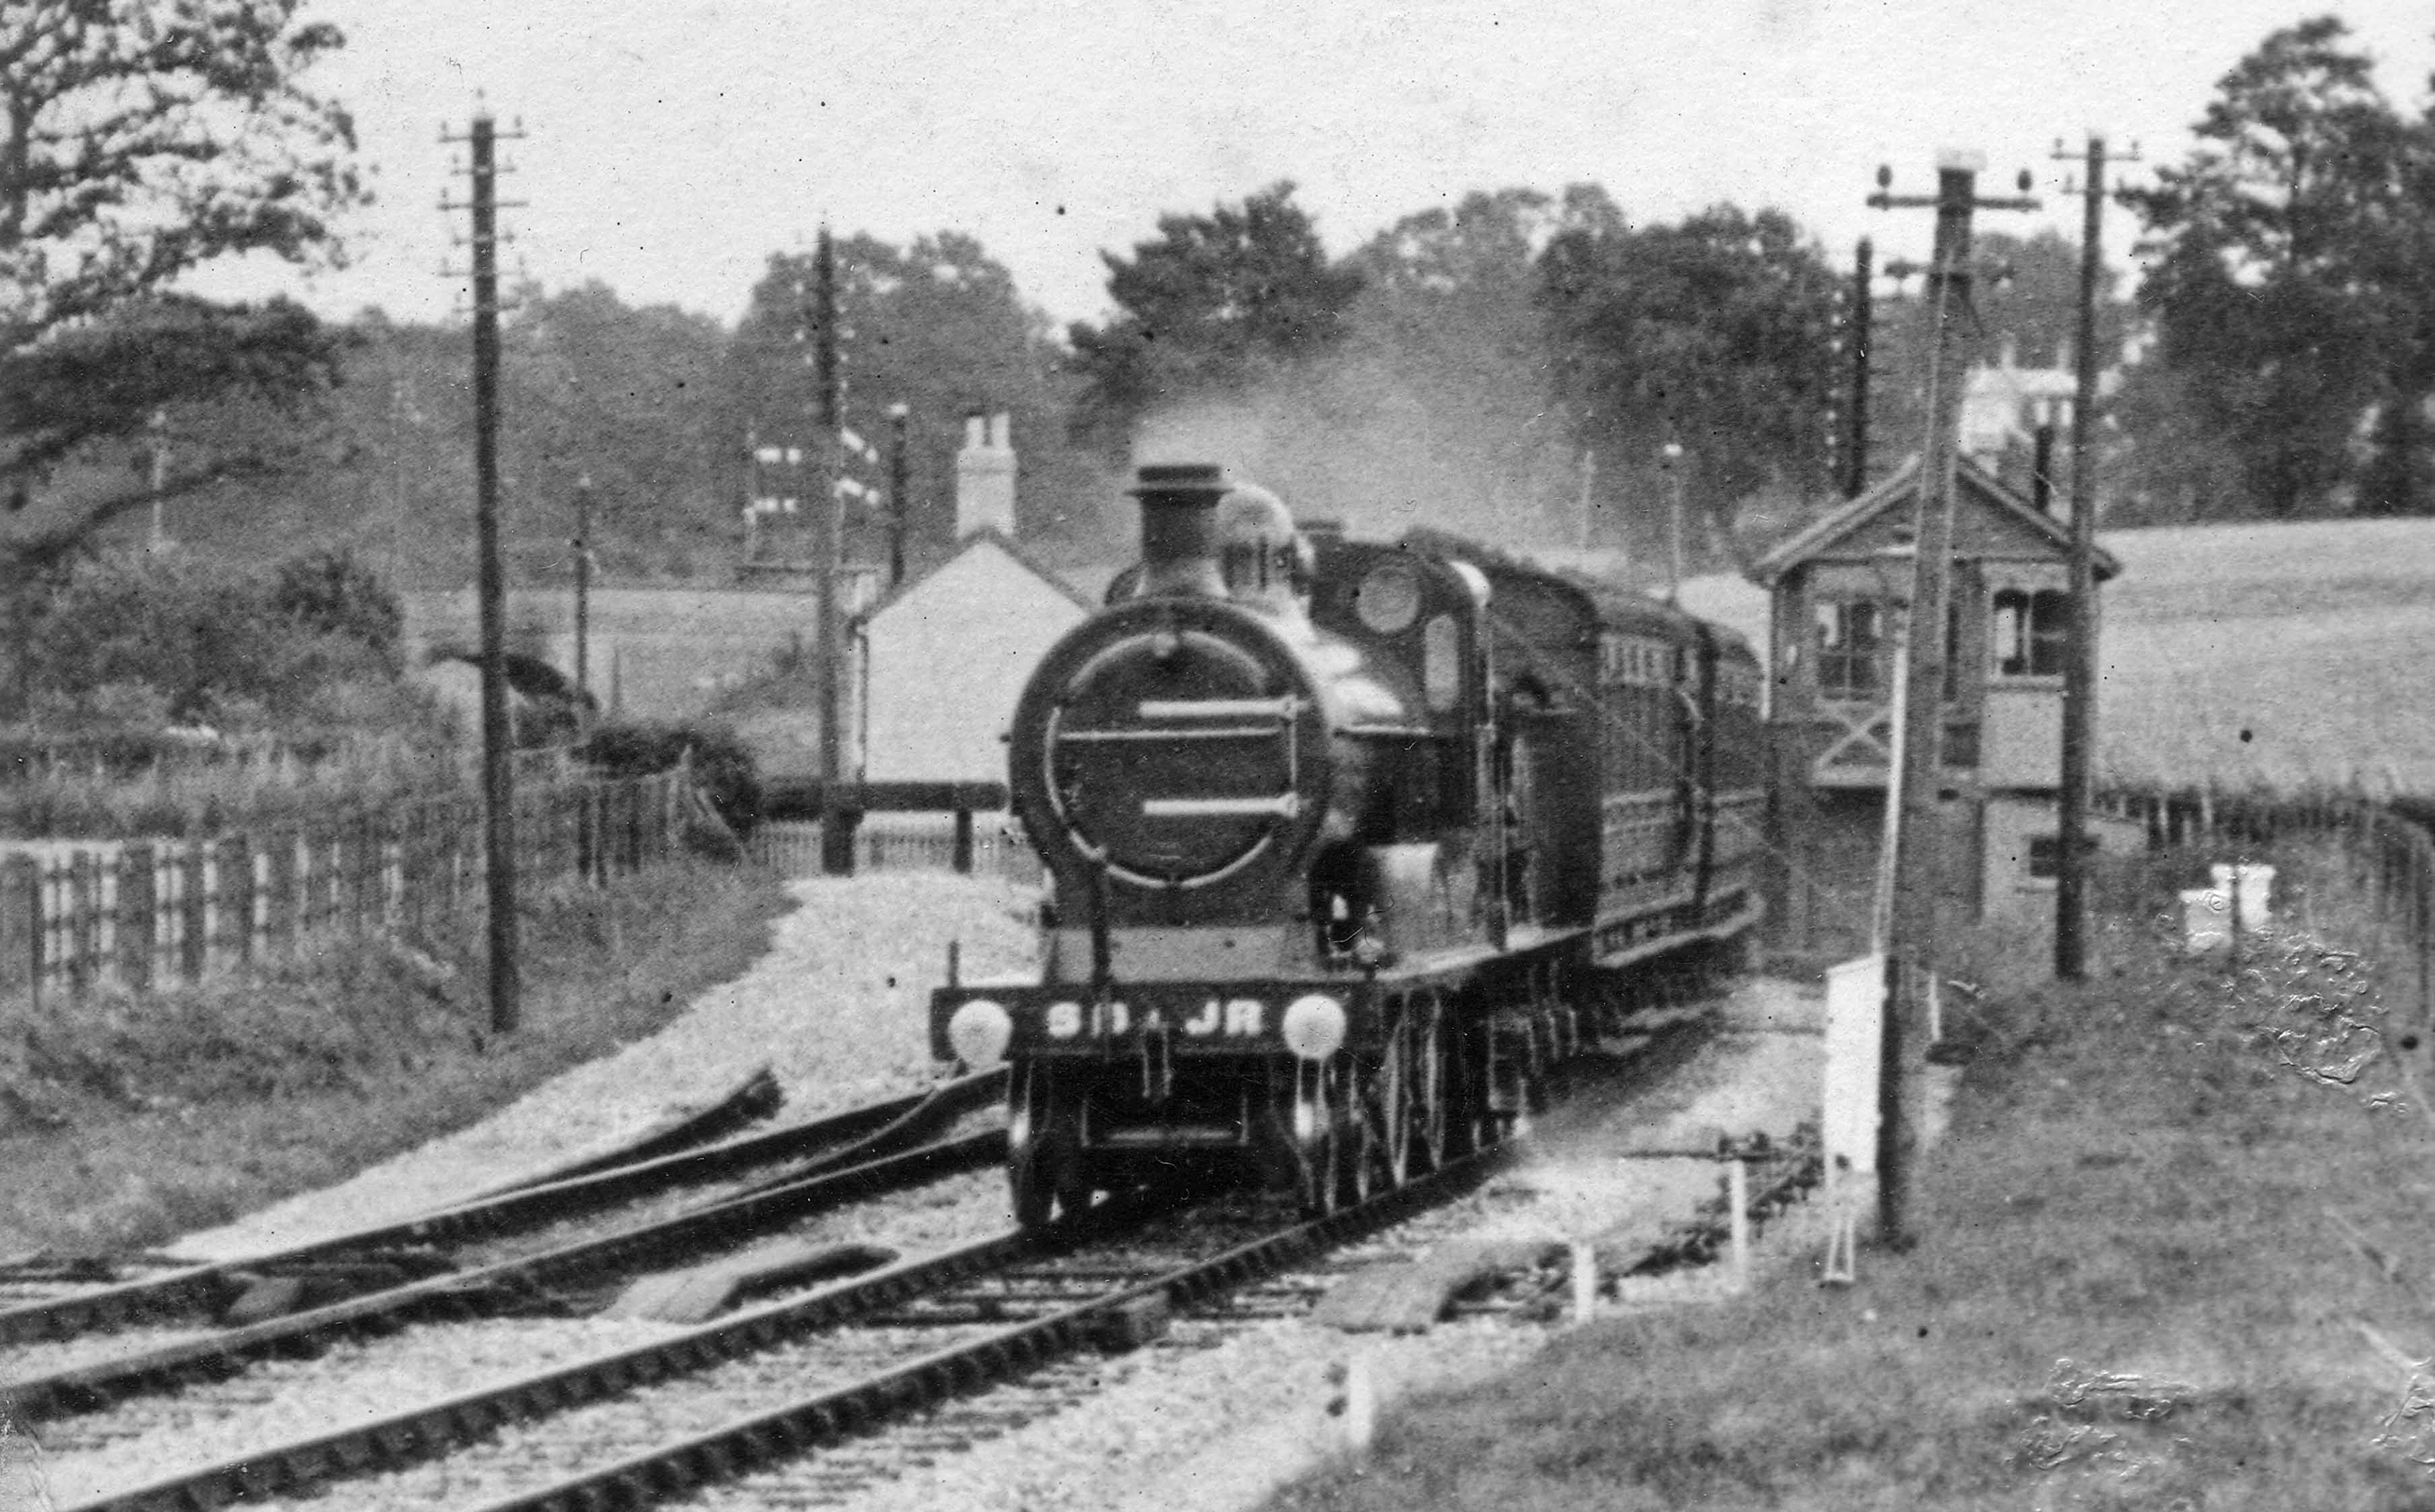
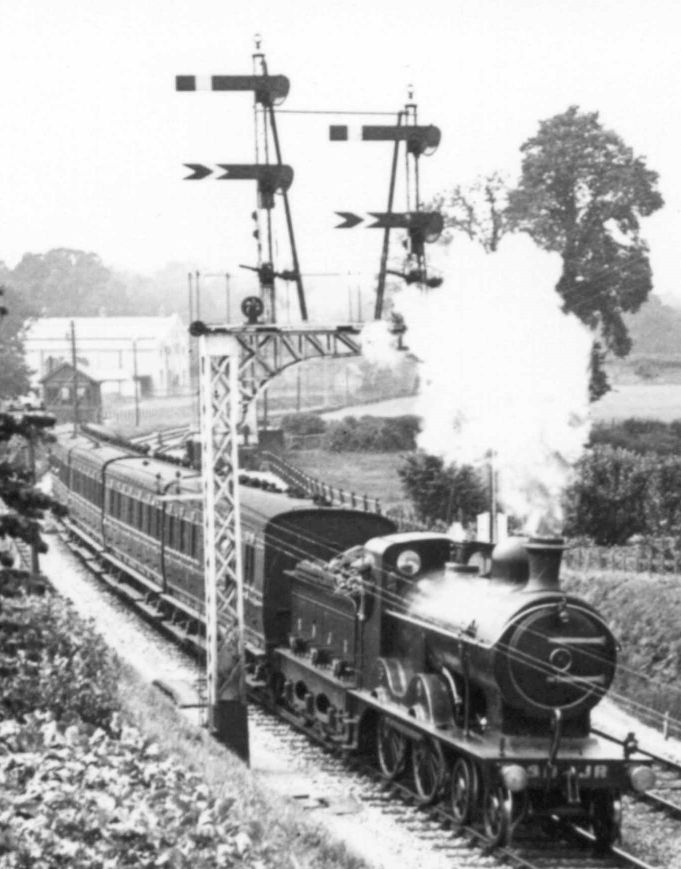
| Up train passing Corfe Mullen Junction | 1905 Signal Diagram | Corfe Mullen Jcn Up Homes | ||
| Click any photo or diagram for a large image | ||||
Points 6 and 12 each lead to a sand-drag on a short trap road; this arrangement not only prevented conflicting movements across the junction, but also enabled the signalman to accept trains from all three adjacent signal-boxes at the same time, thus helping to minimise delays. The left-hand photograph above was taken probably in the early years after the opening of the new junction and the sand-drag in the Down line can be seen to the left of the engine. In the background beyond the crossing-keeper's house can be seen the rear of the Up Homes bracket, with signal 20 (and its lower distant for Bailey Gate Crossing) being 'off', indicating that the train has come from Broadstone over the 'cut-off' line. Just in front of the engine, on the outside of the nearest rail, can be seen Treadle 'A'. The right-hand photograph shows a Down train leaving on the 'cut off' line to Broadstone and passing the Up Home signals circa-1912, at which time the Distant arms were still painted red. The Up Starting signal (17) was located a short distance north-west of road overbridge No 221 and consequently was on a short post to aid sighting under the bridge; a photograph taken circa-1912 shows that at that time the signal post was of the unique S&D rail-built type.
[Note: the 1905 signal diagram is a good example of the problems which can arise when using source material from official records. The original S&DJR diagram depicted the Down Homes signal (2/4) as a bracket with both dolls to the right of the main post, whereas photographs show that the dolls were either side of the post. Conversely the Up Homes bracket (18/20) was drawn with dolls either side of the main post, whereas photographs show that both dolls were to the right of the post. The drawing provided here uses the 'actual' configuration for both brackets. The drawing also depicts the 'official' arrangement of treadles 'B' and 'C' being located between the Up Homes bracket and the over-bridge, but a recently-sighted photograph shows that in fact they were between the signals and the nearby pointwork.]
During World War I some alterations at Bailey Gate Crossing meant that its Up Home signal had to be moved some distance further south towards Corfe Mullen Junction, after which it was slotted to act also as Corfe Mullen Junction's Up Starting signal (17) and the existing Corfe Mullen Junction Up Starting signal was removed. At the same time (1915) Bailey Gate Crossing was upgraded to block-post status, although subsequently it was down-graded to ground-frame status again in 1923.
 |
 |
 |
||
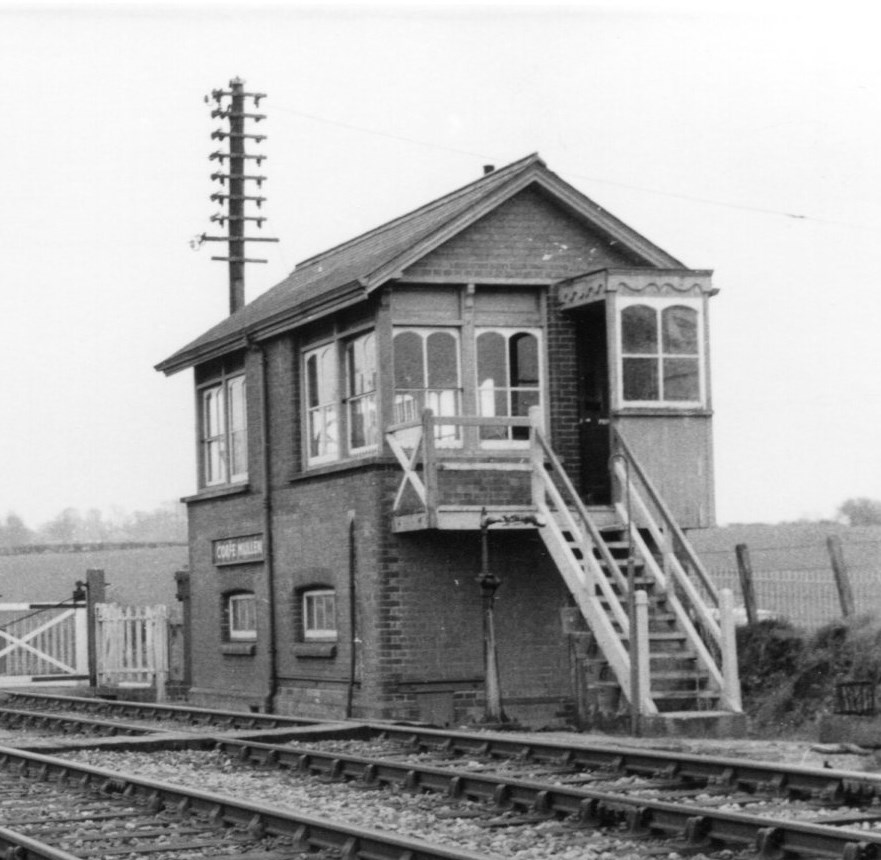
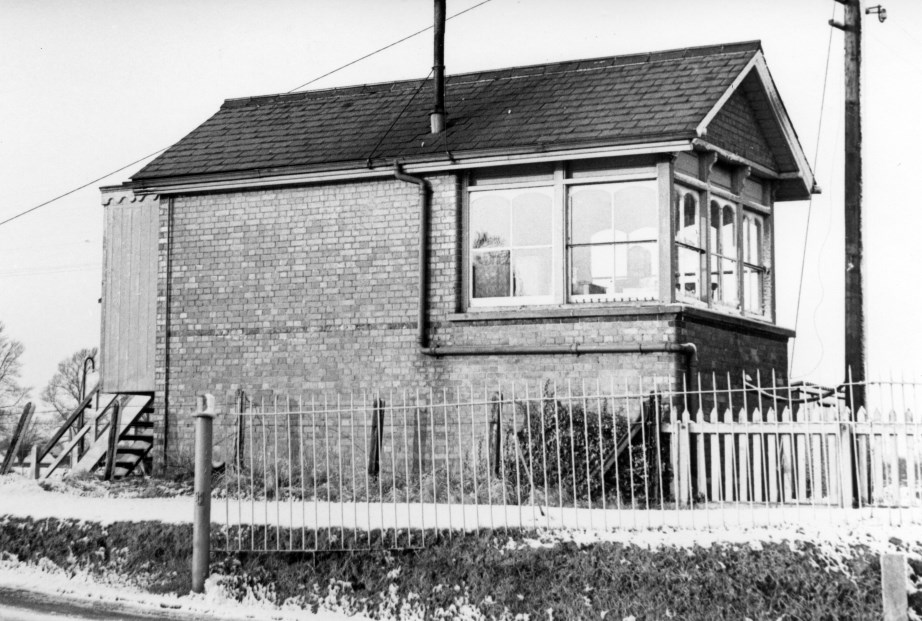
| Front, interior and rear views of Corfe Mullen signal-box in British Railways days Click pictures for larger images |
||||
One feature of Corfe Mullen Junction which remains a mystery of S&DJR signalling was the provision of two 'bridge indicators' (shown as 15 and 16 on the 1905 diagram), which were fixed one each to underbridges on the Wimborne and Broadstone single lines some considerable distance in the rear of the respective Up Home signals. The purpose of these bridge indicators is unknown and no other examples are known on the S&DJR, yet they are not mentioned specifically in the 1905 BoT Inspection Report nor are they described in any known S&DJR records. The manner in which these arms are depicted on the original signal-box diagram indicates that they were pivoted or swivelled in their centre and were fixed to the outside or underneath of the bridge, suggesting that they were directed at road traffic rather than the railway. It is curious that, according to the contemporary locking-table, both levers 15 and 16 had to be reversed in order to release any of the Up or Down Home signals (2,4,18,20), so the passage of a train to/from either single-line required an action which also affected the other line.
The bridge indicators were fixed to two bridges over the same minor road (Brog Street), which ran between the two lines at a point where they were on embankments within 100 yards of each other. It has been suggested that there may have been some (real or imagined) problem with horses being startled if they were on the road in the 'canyon' between the two lines when a train was passing, so the indicators might have been used to give a warning of the approach of trains. Why this should be necessary at Corfe Mullen Junction especially is unclear, particularly as the interlocking did not preclude the fact that a Up train could approach on either line with the relevant Up Home signal 'on' and the indicator might not be operated until after the train had passed it. Map evidence would suggest that they were in existence by 1888, so one may presume that they had been worked originally by the earlier crossing box and were not a new feature in 1905. It is possible (but purely speculation) that the need for them may have arisen from the construction of the cut-off line to Broadstone, as the addition of the embankment for that line would have created the 'canyon'.
The bridge indicators were not marked on the 1929 OS map, so it is possible that they had been removed by that date. Their abolition may be linked therefore with the closure of the Wimborne line to passenger traffic in 1920 and/or a general decline in the amount of horse traffic. Certainly the indicators did not exist after the 1933 alterations; their abolition was not mentioned in the relevant S&DJR Signal Instruction 338 for that work, but that may have been simply because their removal did not affect rail traffic (assuming that they had not been abolished already at an earlier date).
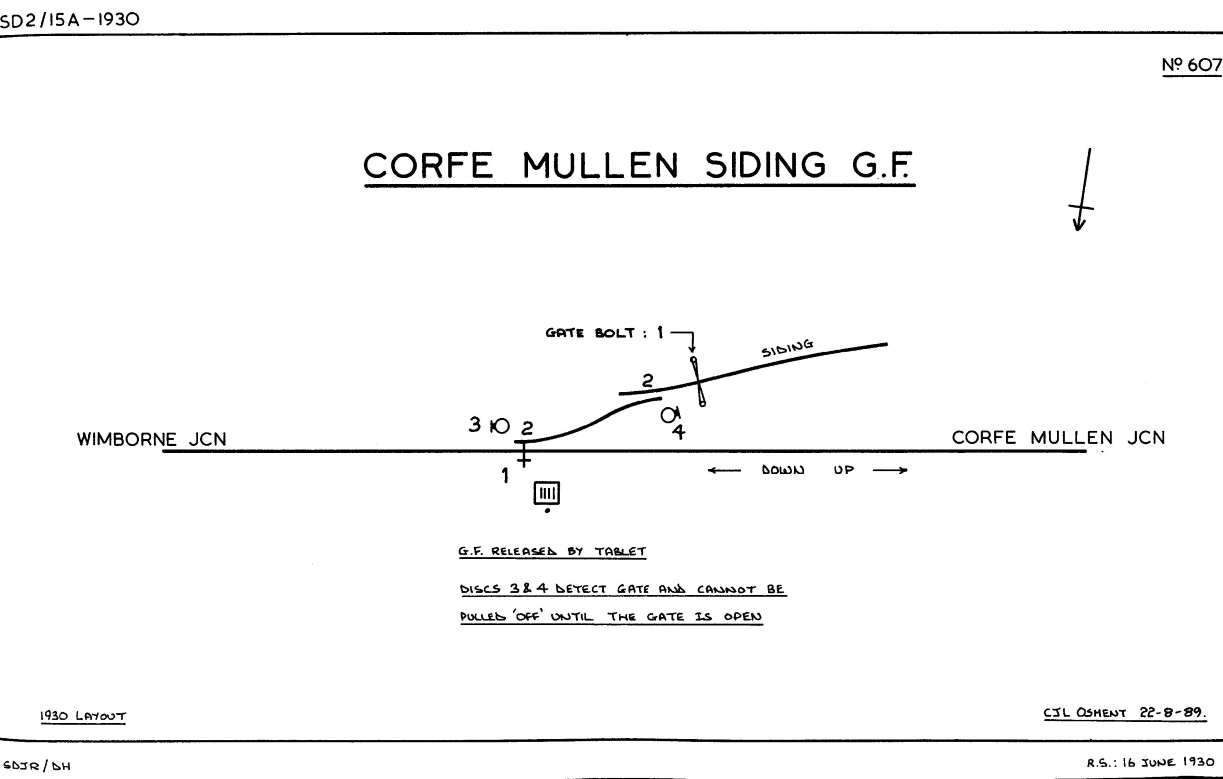
About ¾-mile down the 'old line' towards Wimborne Junction was Corfe Mullen Siding, known generally as 'Carter's Siding' after the clay works which it served. The siding was opened in 1903 on the Up side of the line, with a connection facing to Up trains. The siding was controlled by a 4-lever covered ground-frame (GF), which was unlocked by the tablet for the single-line section (originally Bailey Gate - Wimborne Loop, then Corfe Mullen Junction - Wimborne Loop from 1905). Although only a minor feature of the local railway scene, in due course this siding assumed a greater significance in the future shape of the S&DJR in the area when it had an influence on the alterations which took place upon closure of the 'old line' in 1933. The GF was abolished as part of the 1933 alterations, but the siding itself remained in use until the 1950s. |
 |
|
|
1930 GF Diagram Click diagram for larger image |
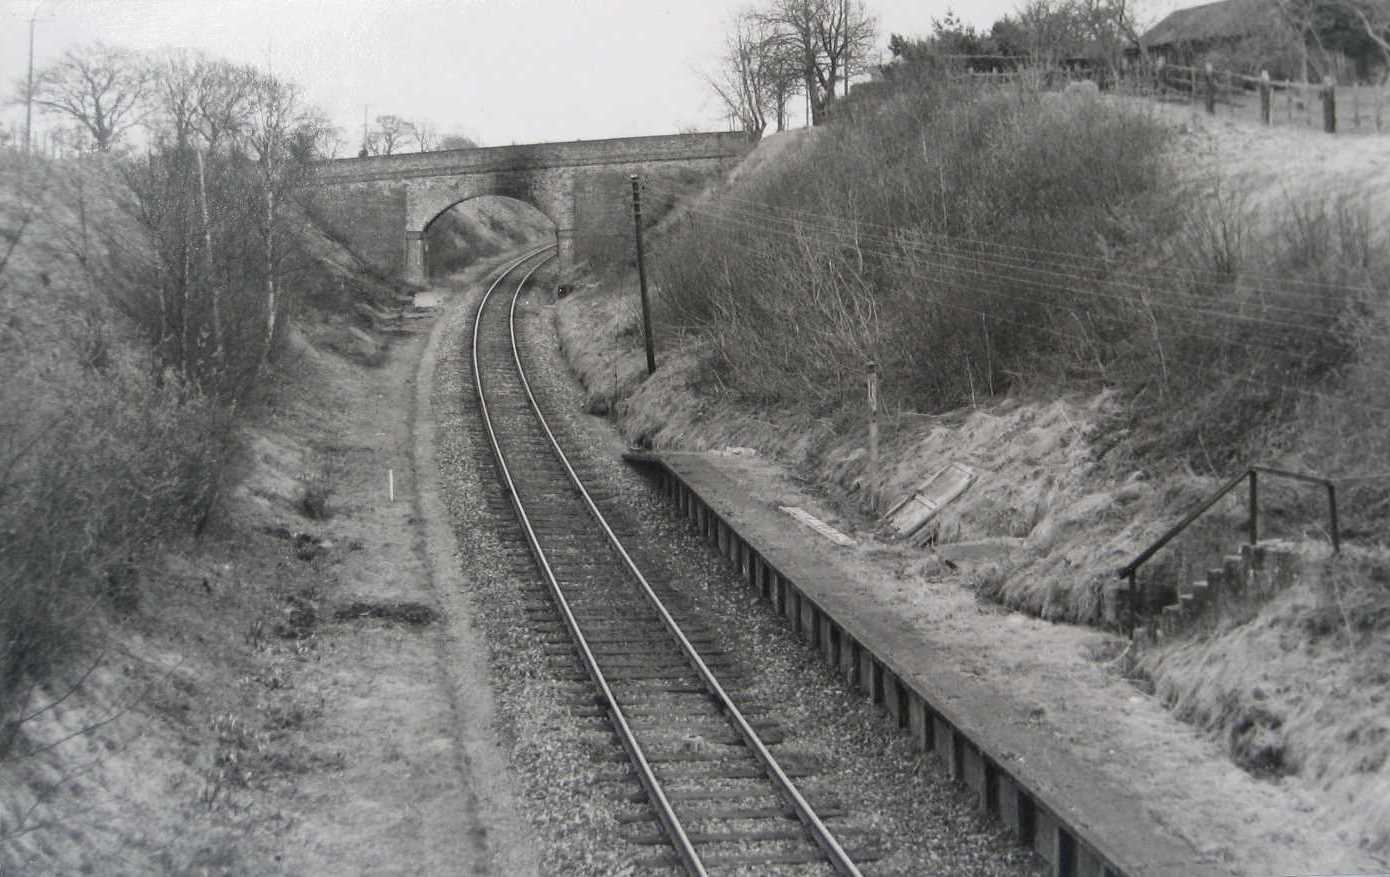
Corfe Mullen Halt was situated on the 'cut-off' line to Broadstone. It was a simple, short platform located on the Up side of the line immediately to the south-east of road overbridge No 235. It was opened on 5-July-1928 for passenger traffic only and it was closed on 19-September-1956. (The photograph shows a view looking south towards Bridge No 236 in the background.) A 1925 map marks a 'ballast stage' (with a narrow-gauge tramway leading away from it) on the up side of the line a short distance north-west of Bridge 235, but no dates for its possible use are known. There is no known evidence for the provision of any siding at that location, but it may have been served simply by trains standing on the main running line to load ballast wagons. |
 |
|
|
Halt in 1963 after closure Click picture for larger image |
An increase in through traffic over the 'cut off' left the ex-DCR line to Wimborne carrying only local traffic and eventually passenger traffic ceased between Corfe Mullen Junction and Wimborne on 11-July-1920, although goods traffic continued until 17-June-1933. There were various proposals to close the line from Corfe Mullen Junction to Wimborne Junction completely and also to double the section from Corfe Mullen Junction to Broadstone Junction which, coupled with the proposed closure of the level crossing at Corfe Mullen Junction (by diverting the minor road eastwards to overbridge No 223), would have enabled the abolition of Corfe Mullen Junction box. At the same time it was proposed to eliminate Bailey Gate level crossing by replacing it with a road overbridge and the result of all these works would have been the closure of three signal-boxes and two gate-boxes. However these schemes never came to fruition and so the signal-boxes at Corfe Mullen Junction and Bailey Gate Crossing remained in use, although Bailey Gate Crossing was downgraded to ground-frame status in 1923 and Lake Crossing was reduced to traincrew-operated status in 1925.
Closure of the 'old' line was complicated by the need to continue to handle the traffic from Carter's siding. The initial suggestion was to retain the line from that siding into Wimborne, with the connection at Wimborne Junction being worked by a ground-frame, and close the line from Corfe Mullen Junction to Carter's Siding. (That proposal meant that most of the 'old' route would have remained in use anyway, but presumably the low level of traffic would have reduced the maintenance costs.) The chosen solution was the exact opposite and the 'old' line was closed completely from Carter's Siding to Wimborne Junction, with only the short length from Corfe Mullen Junction to Carter's Siding being retained. This arrangement enabled the ex-L&SWR signal-box at Wimborne Junction to be closed (the S&DJR box had closed a few years earlier) and also abolished Lake Crossing.
The 'old line' to Wimborne Junction was closed on 18-June-1933 (S&DJR Signal Instruction 338 - click here to read the full text) and the layout at Corfe Mullen Junction was simplified to become merely the end-on junction of the double-track line to the north with the single-track line to the south. Block working to Bailey Gate and Broadstone remained unchanged. The 'old line' was terminated just short of Lake Crossing at 61 miles 21 chains, about 4 chains east of Carter's siding, thereby providing a short spur for shunting the siding. Corfe Mullen Siding GF was abolished, as was the trap point at the exit from the siding, and a hand-lever was provided for the siding point itself. The remnant of the 'old line' was worked now simply as a long Down Siding, accessed by a facing connection off the Down Main, so a ring was added to the arm of the former 'To Wimborne' Down Home signal (2) to denote entry to a goods line.

1933 Signal Diagram
Click diagram for larger image
Under the revised arrangements Carter's Siding was worked by Down trains, which drew their wagons to the siding and then propelled back to Corfe Mullen Junction upon completion of shunting work. On return to Corfe Mullen Junction the train had to be pushed back onto the Down Main in order to clear the Down Siding, so a 'Limit of Shunt' indicator was erected to control this 'wrong road' movement 300 yards in rear of the Down Homes on the outside of the Down Main. (This indicator had the words 'LIMIT OF SHUNT' in red letters on a white background and was illuminated at night.) The curvature of the approach to Corfe Mullen Junction along the Down Siding gave inadequate sighting of ground signal 13 (which controlled the exit from the siding), so a repeater signal 13R was provided 190 yards in its rear; this repeater was of the 'miniature semaphore' type with a yellow arm, so that the returning train could pass it in the 'on' position.
After 1933 the arrangements at Corfe Mullen Junction remained generally unchanged, apart from a few minor alterations. The Up Home (20) (and the lower Up Distant for Bailey Gate Crossing) had remained on the left-hand doll of the bracket that originally had carried also a second doll for the Up Home for the Wimborne line, but on 11-September-1938 (S&DJR Signal Instruction 372) this bracket was replaced by an ordinary straight post signal 60 yards further from the signal-box (just east of road over-bridge No 223). In British Railways (BR days) this signal had a lattice post and both the Home and lower Distant had upper-quadrant (UQ) arms, and the use of UQ arms may date from that 1938 alteration. At some unknown date (possibly early BR period) a track-circuit designated 'A' was installed on the Down Main line, just in advance of the Down Home signals 2/4; it extended to the clearance point between point 10 and 12, and also mid-way across the cross-over.
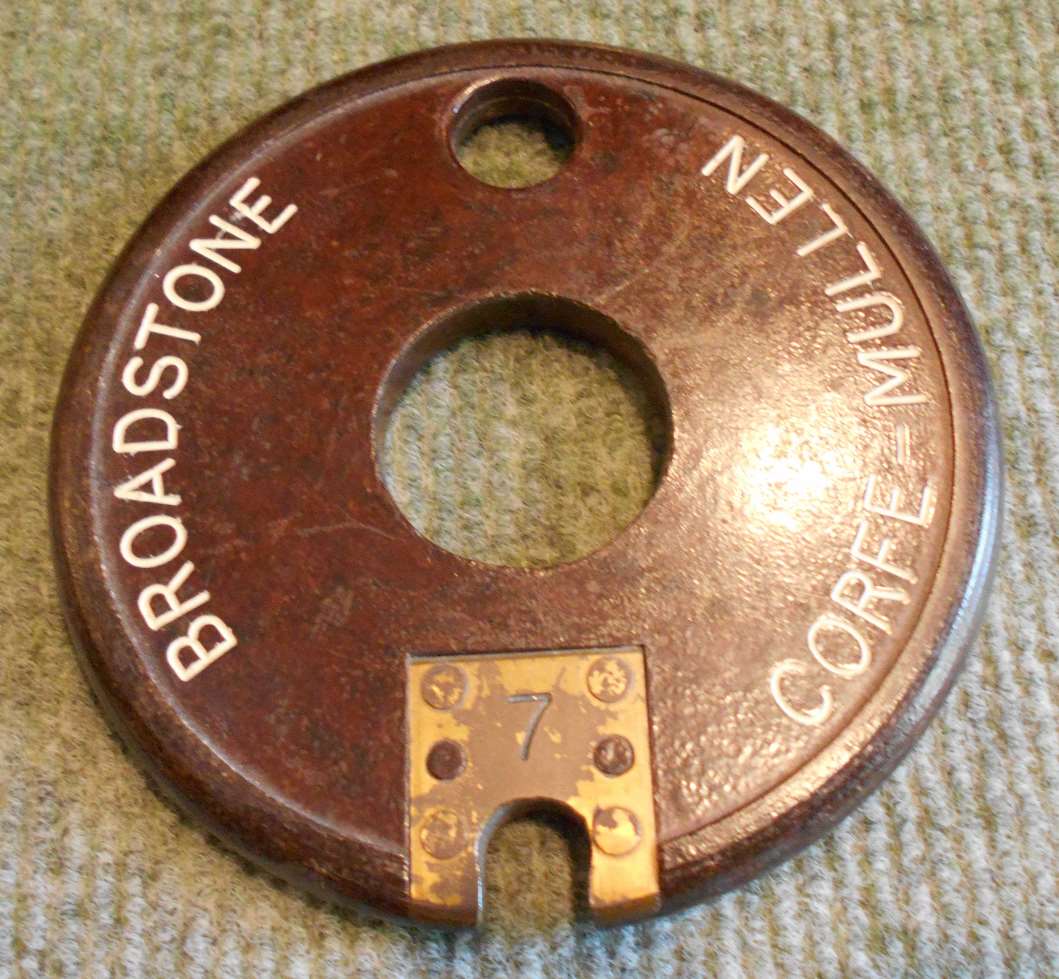 In early BR days the Tyers No 1 ETT instruments on the single-line section to
Broadstone were replaced by the
Tyers No 6 pattern (click picture for larger image of one of the new No 6 tablets). At some unknown date the ring was removed from the arm of
the Siding Home (2), possibly when the arm was converted to UQ (sometime in BR days?). The Down Distant (3) was converted
to UQ in 1953 and the Up Starting (17) in 1957. It is reported that the Down Siding was taken out of use on 19-September-1959,
after the cessation of traffic from Carter's Siding in that month; the line was
cut back to 61 miles 10 chains and used occasionally thereafter for wagon storage,
until that practice ceased circa-1965.
In early BR days the Tyers No 1 ETT instruments on the single-line section to
Broadstone were replaced by the
Tyers No 6 pattern (click picture for larger image of one of the new No 6 tablets). At some unknown date the ring was removed from the arm of
the Siding Home (2), possibly when the arm was converted to UQ (sometime in BR days?). The Down Distant (3) was converted
to UQ in 1953 and the Up Starting (17) in 1957. It is reported that the Down Siding was taken out of use on 19-September-1959,
after the cessation of traffic from Carter's Siding in that month; the line was
cut back to 61 miles 10 chains and used occasionally thereafter for wagon storage,
until that practice ceased circa-1965.
On 6-March-1966 passenger services ceased on the whole of the S&DJR and most of the line was closed, but a few sections remained open for goods traffic and this included the line from Broadstone as far north as Blandford. During 1966 the Up line was taken out of use and the Down line was worked thereafter as a siding for traffic in both directions, crossover points 10 being clipped and padlocked in the reverse position. The arms and lamps were removed from all the signals and a white marker light was provided on the post of the former Up Distant signal (21). Warning boards worded 'STOP DO NOT PROCEED WITHOUT PERMISSION' were erected on each side of the level-crossing to face approaching trains. The signal-box was reduced to ground-frame status and it would appear that it remained in use simply to control the level-crossing gates and their associated locks. Various dates have been quoted for this work, but according to Weekly Notice P/EW27 it took place on 24-July-1966.
The former signal-box was closed completely on 7-May-1968 and the disused Down Siding was lifted later that year. Finally the last remnant of the old S&DJR line in Dorset was closed on 6-January-1969. The signal-box was demolished, but the two level-crossing gates on the Broadstone side still survive, as does the former crossing-keeper's house which is now a private residence. The site of Corfe Mullen Siding has been absorbed into a camping site, whilst Corfe Mullen Halt was buried when the cutting was infilled and subsequently private housing was built on the top.
 |

|
 |
||
| Crossing keeper's house in 2012 | Broadstone side crossing gates in 2012 | Looking south in 1968 | ||
| Click pictures for larger images | ||||
© CJL Osment 2001-24
Acknowledgments to Peter Russell and Tony Cooke for additional information.
B&W photographs John Eyers collection
South Western Circle, tablet photograph courtesy David McGhie, other photographs WCRA collection.
|
© West Country Railway Archives 2001 Page last updated: 19 March 2024 |
URL:
E-Mail: |
||||||


