© 2001-2004 C&StL |
Comment faire de belles images de trains miniaturesVous le savez sans doute, mon métier est celui de monteur et caméraman pour la Société Radio-Canada à Montréal. Je gagne ma vie à faire de la télévision. Cette page n'est pas dédiée à faire de vous un caméraman professionel. Dans cette page, vous aurez plutôt de petits trucs et techniques qui vous permettrons de prendre de meilleurs photos et films de vos trains. L'internet étant plein de conseils plus techniques sur la photographie (le ISO, la profondeur de champ, l'éclairage, les F stops, etc...), je me contenterai seulement de vous donner des trucs relatifs aux trains miniatures. À moins d'avis contraire, le mot "caméra" se référe autant aux caméras vidéo qu'aux caméras photo.
La perspectiveLa perspective est l'angle selon laquelle on regarde un sujet. On peut être objectif ou subjectif. Dans le premier cas, l'objectivité, la caméra regarde le sujet d'un point de vue neutre. Cela signifie que la caméra est à la même hauteur que le sujet. La subjectivité sert à donner au téléspectateur une suggestion sur la grandeur du sujet. Si la caméra est plus basse, on veut suggérer que les trains sont beaucoup plus grands qu'il ne le sont en réalité. Plus la caméra est basse, plus le train semblera grand. Ainsi, un train passant sur un pont vu de sous le pont aura l'air très, très grand. À l'inverse, un train miniature vue du haut des airs aura l'air petit.
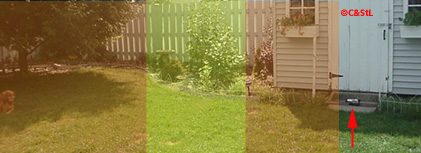
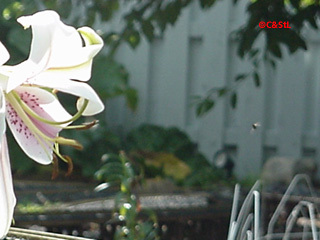
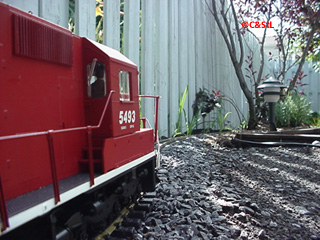
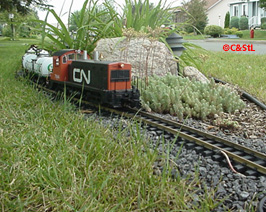
La profondeur de champLa profondeur de champ est la zone nette de l'image.
Dans l'image suivante, la voie au centre est dans la profondeur de champ,
alors que la voie en avant-plan et la clôture de bois au fond du terrain
n'y sont pas.
Les variables qui affectent la profondeur de champs sont les suivantes:
Exemple: Si vous voulez prendre une photo ou un vidéo de votre train de 15 wagons, du point de vue du mécanicien dans la locomotive qui regarde derrière lui, et voir l'ensemble de votre train "net" (aucun wagon n'est flou), vous devrez avoir une grande profondeur de champ. Donc:
La distance caméra-sujet influant moins que la longueur focale (zoom), vous devrez ajuster votre cadrage en avançant ou en reculant la caméra. Le viseur(caméra photo) Le viseur sert, bien sûr, à établir le cadrage. Mis à part les données techniques qu'il peut contenir, prennez toujours l'habitude d'observer les 4 coins du viseur, puis de balayez lentement celui-ci, pour bien votre sujet, mais aussi l'arrière-plan. Ensuite appuyez sur le déclencheur. (caméra vidéo) En plus des trucs donnés dans le précédent paragraphe ajoutons que vous devriez prendre l'habitude de ne pas regarder constamment le viseur de la caméra. Vous pourriez manquer une scène très intéressante juste en dehors du champ de vision de la caméra. Si votre caméra est en grand angle (zoom out), avec un peu de pratique, vous pouvez pratiquement savoir tout ce qu'elle voit sans même regarder le viseur. Les mouvements(caméra vidéo) Premièrement, disons que les mouvements sont à éviter. Le problème de la plupart des vidéo-amateur sont leur trop grand nombre de mouvements injustifiés. Je ne dis pas de ne jamais faire de mouvement. Seulement de les éviter lorsque possible. Mais si faire des mouvements de caméra vous intéresse, voici mes conseils.
Les effets d'exposition(caméra photo) En jouant avec l'ouverture de la caméra et la durée de l'exposition, vous arriverez à créer de très beaux effets visuels, comme du "stream". Cette effet donne l'impression que le train va très vite. Ou encore, vous réussirez à prendre d'excellentes photos de nuit. Le sonLe son est une partie très importante de la télévision. Et souvent négligé! Un bon caméraman écoute autour de lui autant qu'il regarde. Combien de fois a-t-on vu des vidéo amateurs où on entends des bruits intrigants sans jamais savoir ce que c'est! D'un autre côté, n'essayez pas de camoufler votre réalité... Votre voisin passe la tondeuse pendant votre tournage?? Qu'à cela ne tienne! Ça fait partie de la réalité de votre réseau. Tout comme les chats qui miaulent, les chiens qui jappent, les enfants qui crient... Les gens ne veulent pas voir un trains miniature et entendre le bruit d'un vrai. Parce que vos trains n'en sont pas. Le montageLes plans séquences La grande majorité des gens n'ont pas accès à des facilités de montage. Mais il y a quand même moyen de faire des plans séquences. Un plan séquence est un plan continu, sans intérruption de tournage, qui raconte une histoire. Par exemple, on peut partir avec une vue en gros plan de l'ingénieur dans la locomotive, puis la caméra s'éloigne du train. Un aiguillage entre alors dans le plan. L'aiguillage tourne. Le train part. Dans cet exemple, on a très bien pu s'imaginer qu'un chef a débarqué du train pour aller faire tourner un aiguillage avant le départ du train. Et pourtant, cette personne n'a jamais réellement existée!! Les plans séquences demandent cependant de la préparation et au moins un répétition alors que la caméra ne tourne pas. Une séquence (ne pas confondre avec "plan séquence") est un enchaînement de plan qui montrent différent point de vue alors que l'action se passe en "temps réel". Comme par exemple: un train s'en vient vers la caméra. Dès que le devant de la locomotive sort du cadre, on arrête la caméra. On fait reculer le train. On tourne la caméra de 180°, on fait repartir le train, et on commence à filmer dès que le nez de la locomotive apparaît dans le viseur.
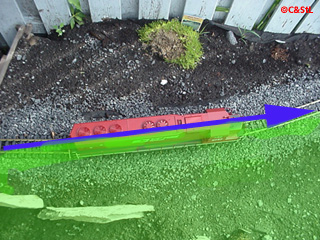
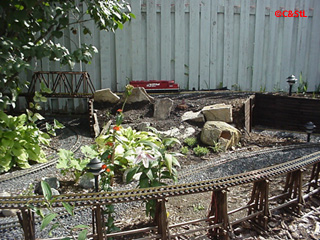
Ce genre de montage donne l'impression qu'il y avait plusieurs caméra lors du tournage. Le téléspectateur est certain que le train faisait une action continu. Un plan de caméra devrait être autour de 5 secondes. Mais la durée du plan dépends uniquement de l'action qui s'y trouve. Parfois, un plan peut durer 20 secondes et être très agréable à visioner. Soyez diversifié. Commencez par un plan d'ensemble montrant votre réseau dans son entier. Puis un plan de moyen (souvenez-vous: approchez la caméra plutôt que de vous servir du zoom) d'une scène en particulier. Ensuite, "décortiquez" la scène en montrant des plans rapporchés. Recommencer avec un plan moyen d'une autre scène. Racontez-vous une histoire en même temps que vous tournez, afin de ne pas perdre le fil. La règle des 180° La règle des 180° est plus un piège qu'une régle à suivre! La règle des 180°, aussi connue sous le nom du "croisement d'axe", s'explique comme suit: Toute action se déroule dans sens, suivant un axe. Dans le monde des trains, cet axe se reconnaît facilement: C'est le sens de déplacement du train. Dans l'illustration qui suit, l'axe est représenté par la flèche bleue. La zone verte représente le côté de l'axe où fût prise la première photo. À partir de ce moment, tous les plans de caméra subséquents devront être pris dans cette zone.
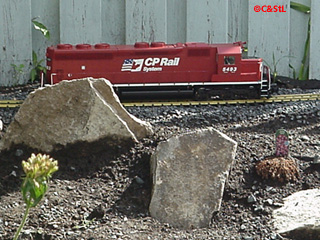
Voici la raison: Si vous observez cette photo, vous verrez que le train se déplace vers la droite du cadre de l'image. Dans la photo montrant l'arrière du train (cette photo), la locomotive s'en va toujours vers la droite du cadre, ce qui est logique. Mais si on mets la caméra de l'autre côté de l'axe, la locomotive ira vers la gauche du cadre... Comment peut-elle s'être retournée si vite?? C'est un illogisme. En résumé, afin que votre train soit plus facile à suivre, filmez-le toujours du même côté de la voie. Si, cependant, vous devez absolument passer la caméra de l'autre côté de la voie, il y a deux trucs: le premier: vous filmez votre train avec la caméra SUR la voie. Ainsi, vous êtes en train de filmer SUR l'axe, donc ni à gauche, ni à droite. Votre train s'en vient (ou s'en va) vers vous. À partir de ce moment, vous pouvez aller de n'importe quel côté de la voie. Le deuxième truc: vous passez de l'autre côté de l'axe alors que votre caméra tourne. Ainsi, le spectateur aura vu votre mouvement et comprendra que le train ne s'est pas subitement tourné de bord. Les scènes statiques et dynamiquesUne scène peut être statique, comme une bâtisse ou une plante, ou être dynamique, comme le passage d'un train. Un bon mélange des deux produit des vidéo plus intéressant. Le cadrageAvant d'appuyer sur le déclencheur de la caméra, il faut, bien évidemment, établir un bon cadrage. Essayer, autant que possible, d'inclure une composition dans vos images. C'est-à-dire: Décentrez votre sujet selon la règle des deux-tiers. Cette règle stipule que le sujet doit se trouver soit dans le tier haut de l'image, soit dans le tier bas. Cela dépends de l'importance que vous souhaitez apporter à ce qui entoure le sujet.
Un dernier conseil... Faites vos ajustements (foyer, cadrage, éclairage,...) AVANT de commencer l'enregistrement.
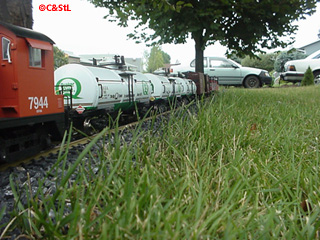
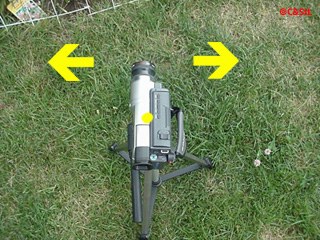
LexiqueEnfilade Une enfilade est un plan permettant de voir l'ensemble du train, en angle. Un pan, abbréviation du mot panoramique, est un mouvement de caméra où la lentille pivote de gauche à droite (ou de droite à gauche) sur axe passant par le centre de la caméra (le point jaune sur la photo). C'est l'équivalent de se tourner la tête pour suivre un action.
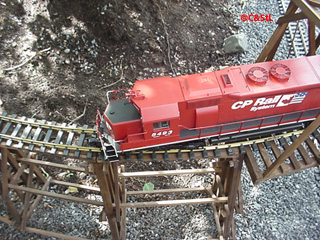
Grand angle et petit angle Un grand angle, c'est lorsque la lentille de la caméra voit le maximum de ce qu'elle peut voir. On dit aussi "petite longueur focale", "zoom out", "wide shot" (d'où le W qui figure sur votre caméra).
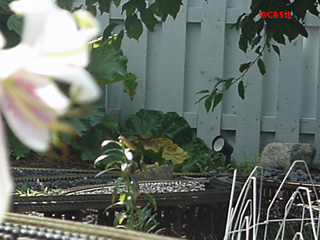
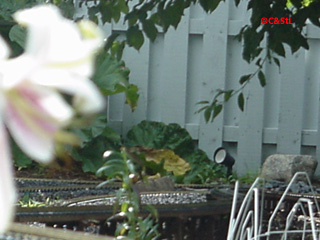
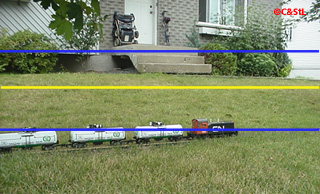
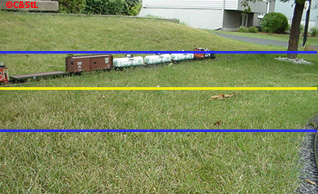
Un petit angle, c'est quand la lentille de la caméra voit une petite zone très loin de la caméra. On dit aussi "grande longueur focale", "zoom in", "telephoto shot" (d'où le T qui figure sur votre caméra). Cette photo (ci-bas) fut prise exactement du même endroit que la photo ci-haut. La photos ci-haut est en grand angle, alors que celle du bas, en petit angle.
Plan raccord Un plan raccord est une suite de plan où l'action s'enchaîne. On utilise cette technique pour donner l'impression qu'il n'y avait qu'une seule action, mais qu'il y avait plusieur caméras lors du tournage. Avant de copier cette page, lisez le copyright How to make nice shots of your layoutAs you maybe know it, I'm working for the Canadian Broadcasting Corporation (CBC) in Montreal. I'm a professional cameraman and editor. Making TV, it's my job. The goal of this page is not to make you a professional cameraman, but to give you simples tips and techniques to get better shots of your trains. The internet is full of very technicals tips about photography (ISO, depth of field, lighting, F Stops,...) so I will not be going to technical here. I clearly targets miniature trains. Except when notice, the word "camera" refers to still and video camera. The perspectiveThe perspective is the angle on which you look at the subject. You can be objective or subjective. In the first case, objectivity, the camera look at the subject from a neutral point of view. This means that the camera is at the same height of the subject. The subjectivity is used to get an opinion about the subject to the viewer. The more the camera is under the subject, the more it will look tall, or big. This way, we can suggest that our trains are definitivly taller than they are in reality. A locomotive going over a bridge, shot from under, will seems very, very big. The opposite is also true. A shot from above will make the train look smaller.
The depth of field
The following factors influences the depth of field:
Example: You want to take a picture of a string of cars, viewed from the engineer point of view. All the train must be clear. You need a large depth of field. So:
The distance camera-subject is more important than the zoom factor in the depth of field. Establish your frame by moving the camera instead of using the zoom function. The viewfinder (Photo camera) The viewfinder is there, of course, to frame the picture. Except for the technical data it shows you about the status of the camera, you look in it to see if everything look right before pressing the button. Try to always look at the 4 corners of the viewfinder first, and then, scan the entire screen diagonally. Do this slowly. Look at your subject, then at your background. Then, press the button to take the picture. (Video camera) Use the same tips given in the last paragraph, but take the habit to not always look in the viewfinder when shooting. You can easily miss a very nice scene just outside the view of the camera. If you are in wide angle (full zoom out), you can even shoot whitout looking in the viewfinder. You just need a little practicing to do this correctly. The movements (Video camera) First, let's says that the biggest mistake of every amateur video is the movements. They have too much movements, most of them not justified. I don't says here to never use a movement. I just say avoid them. Each movement must have a reason to exist. But if you are still interested in doing camera movement, here is my tips:
The exposure effects (Photo camera) If you play with exposure opening and time of your camera, you will be able to generate very nice effect, like stream. This effect give the train a feeling of movement, because the train become blurish and the rest of the picture stay clear. You can also took excellent night shots. The soundThe sound is a very important part of any television program. But maybe the most neglected. A good cameraman always ear around him during filming. On amateur video, you can, too often, see scene where a strange sound was earn just outdise the view of the of camera. And because the cameraman was too concentrate on the viewfinder, we will never knows what this sound was... Once again, act as human, not robot. When you ear something intersting behind you, you turn your head... naturally! Do the same when filming. On another side, don't try to hide your reality! The neighbour's dog is barking? Well, that is part of garden railroading too! As of kids playings, lawnmower, etc... People don't want to see miniature trains and hear real ones. Because your trains are not real ones.. EditingSequence shot Most of you don't have access to editing facilities. But you can always do sequence shot. A sequence shot is a continous shot, telling a short story. For example, you can begin with the close-up of an engineer in his cab, then the camera go back a little, a turnout entering the frame and the turnout is thrown. Then the train starts moving. Everybody can imagine the brakeman going from the cab to the switch, turning the switch and the train departs. But the brakeman never existed! Be aware: continous shot like this needs pratice and rehersal before shooting the scene for real. An edited scene is two or more scenes shots to give the illusion of having more than one camera on the set. The viewer gets the illusion of only one continous action, in real time. But in fact, the scene was shot several time, the camera being moved each time. As an example, a locomotive is coming toward the camera. You stop the camera as soon as the nose of the loco gets out of the frame. You replace the train, you turn the camera 180° and you restart the train. Start filming when the nose of the locomotive will enter the shot.
This kind of shooting gives the illusion that many cameras were used in the shooting. But the viewer will be sure that the train never stopped. An uneditied scene must not exceed 5 seconds. But the main factor to determines the duration of a scene is the action contain in it. A scene can be 20 seconds long, if the action justify it. But try to not extend the scene if it's not necessary. Too long scenes becomes rapidly boring. Be diversified. Begins by showing a wide shot of the entire layout. Then a medium shot. Remember: it's not necessary to use movement. You can stop the camera between each scene. If you want movement, try to walk into the scene instead of using the zoom. After, "detail" the scene with close-up of the action. Start over with the medium shot of another scene, and so on. Tell you a story in the same time as you shot, to keep the momentum of the video. The rule of 180°The rule of the 180° is very important to understand in the making of a video. This rule, also know as "switching the axis" can be explained that way: Each action has an axis, a direction. In the world of trains, this axis is easy to recognize: it's the direction of travel of the train. In the following picture, the axis is represented by the blue arrow. The green zone is the area where the first shot of the scene was took. From this moment, every other shots must be taken from this side of the arrow, in the green area.
Here is the reason: If your observe this photo, you will see the train going toward the right side of the frame. The next photo shows the train from behind, but the locomotive is always going toward the right side of the frame. If the camera is placed on the other side of the blue arrow (not in the green zone), the locomotive will be heading toward the left side of the frame... How the locomotive can turn itself so quickly? It's simply not logical. The tips to remind is easy: always shot your train from the same side of the track. But if you want to cross on the other side, for any reason, you still get two solutions: The first one: shoot the train with the camera ON the tracks. The camera will be placed directly on the axis of the action, not at left, not at right. The train is coming at you (or going away from you). From this point of view, you can go on any side of the track after. The second tips, is very simple: simply pass the camera on the other side while filming. That way, everybody will see the camera crossing the axis and undertsand that is not the loco which has changed the direction. Dynamics and statics scenesA scene can be static, like a plant or a building, or can be dynamic, like a train going in the shot. A nice mix of the two produces a very interesting video to watch. Don't be afraid to shoot something else than your trains. Shows your landscape, your strutcures, everything. You will get more of those "wow" comments from the viewers! The framingBefore pushing the button of the camera, you must, of course, establish the frame. Try to include a picture composition in your images. This mean:
A last one...Always do the adjustments (focus, framing, lightning,...) BEFORE pressing the REC button. GlossaryA pan, short for panoramic, is a movement of camera where the lens are pivoting left to right or right to left around an axis going throught the center of the camera (yellow dot on the illustration). It's like turning the head to look around you.
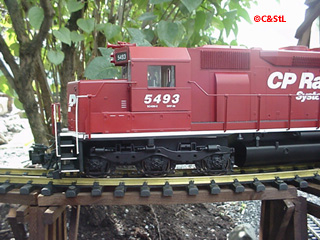
Wide angle and telephoto angle A wide angle (the "W" on your zoom control) is a lens setting where the camera see the maximum she can view. Synonyms are "short focal lentgh", "zoom out", "wide shot".
Telephoto angle A telephoto angle (the "T" on your zoom control) is a lens setting where the camera sees a very closed view of something, far from the camera. Synonyms are "long focal lentgh", "zoom in", "telephoto shot", "close-up". Those two (upper and lower) images were shot from the same point of view. Only the zoom factor was changed. The upper image is a wide shot photo, and the lower one, a close-up photo. Look how the two-third rule was respected.
Continious scene A continous scene, or raccording plans, is a suite of different camera angles where the main action is the same. This technique is used to show a single action under different angles, giving the viewer the feeling that many cameras were used during filming. |


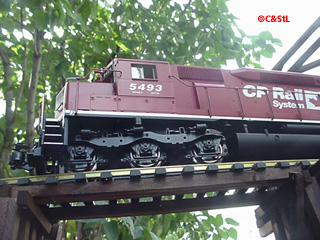
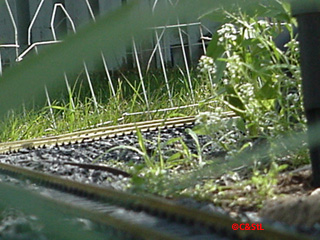 La profondeur de champ est très utile pour mettre
en valeur un sujet particulier. Tous le reste étant flou, notre oeil
cherche naturellement à regarder ce qui est nette.
La profondeur de champ est très utile pour mettre
en valeur un sujet particulier. Tous le reste étant flou, notre oeil
cherche naturellement à regarder ce qui est nette.