The subject of this page is application of the Large Scale Kadee knuckle coupler. I don't intend to spend much time comparing the Kadee coupler against other brands. If you'd like this information, check out the August 1996 Garden Railways for an article entitled "Comparing Couplers" or see the original version of the article at Large Scale Coupler Tips.
As you might have noticed from another tips page on this site, The Care and Feeding of LGB Knuckle Couplers, I also use LGB Knuckles but on a different layout.
Sometime after 1990 while I was developing the Geologically Improbable Railroad, Mountain Division I investigated the Kadee coupler but rejected it for a couple of reasons. It was (and still is) hard to manually uncouple and spotting cars downgrade from an uncoupling magnet is impossible. Also at that time, the price of the LGB knuckle and the Kadee coupler was equivalent. Even though its appearance was less than ideal, I chose the LGB knuckle because it worked really well in that application.
When I started the outdoor version of the Geologically Improbable Railroad I reevaluated my choice. This time I chose Kadee couplers for several reasons.
Since most of my proposed rolling stock would be Aristo and would have Aristo couplers already installed, I had considered using the Aristo knuckle for awhile, but I decided against it.
I ended up with Kadee couplers on the outdoor layout. However, once that choice was made, more decisions were required. The implications of those decisions is the real subject of this page.
[ Top ]The Large Scale Kadee knuckle coupler is a scaled up version of the HO coupler which has become a defacto standard in the HO world. It works pretty much the same. Operation of the Kadee coupler is described in Kadee's Web Site at How Our Couplers Work.
[ Top ]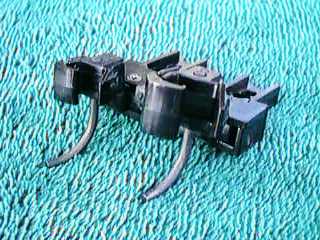 Large Scale Kadee couplers
come in two sizes, G scale and #1 scale. These are approximately
the right size for 1:22.5 and 1:32 scale stock. The table below
contrasts the advantages and disadvantages of each size.
The G Scale couplers use 3 digit numbers such as #831. The #1 scale couplers have all the same mounting configurations and have a four digit identifier such as #1831.
| "G" | "#1" | |
|---|---|---|
| Appearance | Too big | Good |
| Performance |
Better than #1 Scale Stays coupled in more situations |
More difficult to uncouple a single car Uncouples more easily on abrupt vertical gradients |
| Car Spacing | Somewhat larger than #1 Scale | Less than "G" Scale |
| Compatibility with other brands |
Couples to LGB, Aristo, USA, Lionel Poor with Bachmann |
Less reliable than "G" Doesn't work with Bachmann at all |
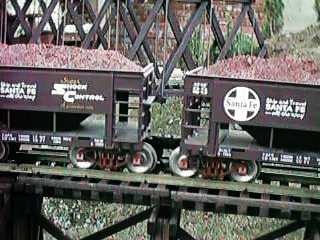 Once you've picked
a size, you must decide how you want to mount the couplers. If you
want to get car spacing like in the photo, then body mounting is
the ONLY way to go. However, if you haven't
designed your track geometry to take body mounted couplers into
account or you don't understand the geometry issues, then you
should use truck mounting. You can mix and match, truck mounted and
body mounted couplers will interoperate.
If you are planning a layout and would like to use body mounted couplers, then I recommend that you get the book "Track Planning for Realistic Operation" by John Armstrong. Actually, I would recommend that you get this book and read it cover to cover anyway. You'll learn a lot from a man who knows his stuff. This book discusses track geometry issues in depth and all of the information presented there is applicable to large scale trains. Pay careful attention to the track geometry issues or you will have troubles with body mounted couplers. Body mounts will have more difficulty coupling on curves than truck mounts under any circumstances.
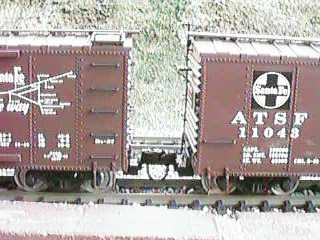 It is
possible to achieve acceptable car to car spacing with truck
mounted couplers as shown in the photo of these two USA Trains
cars. To achieve this spacing, modification to the tang on the
truck is necessary. If you just attach an #831 to an LGB or similar
car, you will have to drill a new hole for the screw and the
coupler will stick WAY out. Then the cars will be
spaced very far apart. You can close this gap by almost 1-1/2" by
cutting off the end of the tang on the truck and using the original
screw hole. If you are afraid that this modification is too severe,
don't worry about it too much. The old coupler will still screw
back on and be fully secure. The extra part of the tang really
isn't necessary. You will end up with car to car spacing that is
1/2" to 1" larger than body mounting (depending on the car design)
but the spacing is at least getting reasonable.
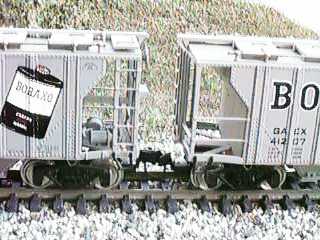 Couplers on Aristo
cars can be truck mounted and produce a little closer spacing than
other cars, see, Truck Mounting on Aristo
Cars. Again, the spacing is determined to some extent by the
design of the car.
| Body Mounting | Truck Mounting | |
|---|---|---|
| Mounting Difficulty | Requires car body and truck modifications | Can be mounted on most cars without modifications to the cars or couplers |
| Car to car spacing | Can be set to prototypical distance |
Tends to be much wider than prototypical spacing Closer car spacing can be accommodated with minor modifications to the coupler mounting tang or the coupler body |
| Curve Tolerance | Requires larger radius curves (4') Intolerant of "S" curves |
Handles 2' radius curves well "S" curves are OK |
| Tolerance to being pushed | Handles pushing well |
Higher drag due to truck cocking More prone to derail, especially on turnouts |
| Drag in curves | Lower, trucks are free to follow the track with minimum drag | Higher, coupler forces twist trucks and causes flanges to bear on rails in curves |
| Coupling on curves | Can be unreliable even on 4-6' radius curves. couplers tend to flop sideways instead of mating even when mounted on short stock such as the ore cars shown above. Longer stock will behave worse. | Couplers face each other more directly and will usually couple on 4' radius curves without regard to the length of the rolling stock. Coupling on 2' radius curves is also possible if you shim your wheelsets to keep the coupler centered |
 No
matter what kind of coupler mounting you select, you should buy a
coupler height gauge. The device comes in two versions, #829 for #1
scale and #880 for G scale. This device makes it very easy to
determine if you mounted the coupler at the proper height and it
checks out the operation of the coupler. It also has a track and
wheelset gauge indicator cast into its base. A jig that is attached
to the bottom of the gauge can be used to properly center and set
the height of an uncoupling magnet.
The Kadee coupler is very sensitive to proper mounting height. If the coupler body is too low or too high, they are more susceptible to coming uncoupled. This is especially true of the #1 scale couplers. If the trip pin is too high, the couplers will not reliably uncouple at an uncoupling magnet. If the pins are too low, they'll catch on the magnets and either kick the top part of the magnet off or derail the car. They can also catch in frogs or other track elements.
Not only is it important that the coupler height be correct without external loads, you also have to pay attention to the coupler height under the dynamic loads placed on them while in a train. If the coupler mount is not stable, the couplers (especially truck mounted ones) will tend to dip when they are loaded. This will cause the trip pins to catch on magnets or other track elements such as turnouts when the car is part of a train, but not when the car is tested by itself. The fix for this is usually to tighten the truck mounting screw. If the tightened screw restricts the ability of a truck to rock side to side a little, this can also cause derailments. You want a truck to rock side to side and still not allow the coupler tang to rock up and down. It may be necessary to devise stops to prevent the trucks from rocking fore to aft.
Kadee makes a large variety of mounting configurations, most of them are special designs for a particular piece of rolling stock or locomotive where the mounting is a little odd. For most cars, you can get away with just a few types.
You can see all of Kadee's configurations at Scale Couplers or at Scale Couplers.
Some Kadee coupler styles, such as the #830, have a draft spring that both centers coupler and provides some give in the draft gear. I personally don't like this draft gear arrangement as there is a lot of runout in the couplers as you literally stretch out a train. This makes it more difficult to control the train and can be really frustrating when you are trying to uncouple cars near the end of a train. I prefer the stiffer mount of the short box type such as the #835.
| Kadee #830 | Kadee #835 |
|---|---|
 |
 |
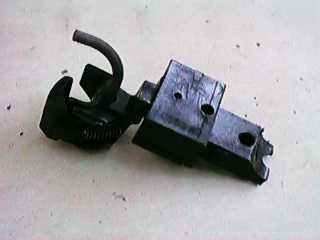 Kadee #831 coupler
boxes can be easily modified to mount on Aristo cars in such a way
that the car to car spacing is at least close to prototypical. The
only way to get the cars closer is to body mount the couplers.
I use a Dremel cutter tool to grind off the back part of the coupler box so that it will tuck under the axle. Then the coupler can be mounted in the existing hole. If you've used metal wheels with a smaller diameter than the stock Aristo plastic wheels, you may need to use one of the black Kadee supplied shims under the back part of the coupler body to cant the coupler upward to the right height.
The Kadee coupler has a good reputation for performance, although it does have some idiosyncrasies. The major one stems from the Delayed Coupling feature that is used for spotting cars away from a magnet. If your engines do not run smoothly at low speed or your track isn't dead level while you are spotting cars, you will become extremely frustrated. In the delayed coupling mode, the cars will be inhibited from recoupling for only as long as the couplers remain in physical contact. If any slack develops, the couplers will snap back to their normal coupling mode and recouple the next time that they touch.
| Pro | Con | |
|---|---|---|
| Coupling | Easy anywhere as the couplers never latch shut | Easy anywhere, even if you don't want them to |
| Manual Uncoupling | No advantage | Difficult, can be aided by a special tool |
| Automatic Uncoupling | Easy, fairly reliable |
Requires track magnet Couplers must be mounted at the correct height Must have good slow speed engine control Magnets on mainline may cause undesired uncoupling Magnets get in the way of track cleaning Magnets will trip sound systems |
| Car Spotting | Delayed uncoupling allows car spotting away from a track magnet |
Can't spot cars downgrade from a magnet Unsteady locomotive motion will upset delayed uncoupling |
| Weather Resistance | Poor | Springs and trip pins rust |
| Coupler Mounting Height | Can be set with a coupler height gauge | Proper mounting height is critical for reliable uncoupling |
If you elect to paint your couplers and still want them to work properly, the mating surfaces of the couplers MUST be free of All vestiges of paint. Even a wisp of paint on the front of the knuckle will cause the couplers to cease to couple properly. Clean any paint off the mating parts of the couplers with a cotton swap soaked on lacquer thinner and then rub graphite onto those surfaces.
[ Top ]The Kadee uncoupler is a strong magnet mounted between the rails. The mounting heights of both the couplers and the magnet is critical to achieving good reliability. Kadee makes several versions. Two are already integrated into track sections, one is designed to be permanently mounted in an existing track section and one is "portable." I use only the portable version as I want to be able to move the uncouplers around as my operational plans mature.
 The Kadee #844 Portable Uncoupler is a four piece assembly that
mounts on and between the ties of LGB or Aristo European style
track. When this device is called portable, you have to realize
that for it to work, it has to be glued down so that portability is
somewhat limited. The magnet is strong enough to lift itself out of
place in the presence of the coupler trip pins. While I am still
trying to determine optimal locations, I use a little ordinary
contact cement to hold it down so that it won't jump all over the
place. After a "final" location is determined, I use Crafter's GOOP
to stick it down more or less permanently. You have to be sure that
the layer of glue is very thin, or you will have troubles with trip
pins striking the magnet.
If you use track with different tie spacing, such as Aristo American style track, then you will need to trim off some of the material from the bottom magnetic piece so that it will fit around the tie plates. The magnet material is very soft so that it can be trimmed easily with a rail nipper or wire cutter.
 The
#842 magnet is somewhat less expensive than the #844, but you have
to cut away some ties to make it fit and I find that it provides no
operational advantages over the #844.
Manual uncoupling is one of the most frustrating limitations of the Kadee coupler, especially if you have fat fingers like mine. Don't even try with your fingers. Just pick the car up so the couplers pop over each other.
You can use a tool to aid in manual uncoupling and then it becomes fairly easy. Just grab one of those real long 3/16" straight blade screwdrivers that comes with almost every screwdriver set. Its the one that you've never used. From above, place the blade in the gap between the couplers and twist 90 degrees and the cars will just pop apart. I've also used a chop stick with a flat whittled into the end.