


This page shows the simple process of powering Tomix Tomytec "Railway Collection" cars with the appropriate power chassis. It takes only minutes and requires no tools. The end result is a reasonably low-cost electric railway train. I chose the Ohmi Railway cars from Railway Collection #6. (Note: You have to get Tomytec Tetsudou Railway Collection cars when they are available, because when they are gone, they are gone! I bought these cars separately on Ebay, instead of buying the whole collection, and bought the chassis kits as part of a larger order from Japan.) This bodyshell has very American characteristics and a classic vintage look. Features I liked are the full wood/canvas style roof, separately mounted roof headlights, square-cornered double-sash windows, Brill 27MCB trucks and General Electric underbody gear.
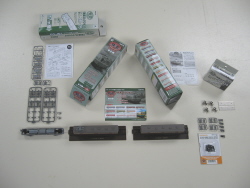 |
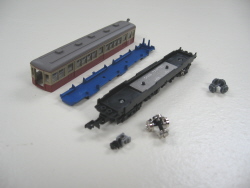
Here are the components. Left to right are the Tomytec TM-05 power chassis (made to go with the Railway Collection #6 cars), the Ohmi Railway #202 car with pantograph, the companion #1202 car, and the TT-04 kit for adding a weight and metal wheels to the unpowered car. My unpowered car actually rode fairly well on its plastic wheels with no added weight, but I decided to give it the full TT-04 treatment. The final package, lower right, is a Bachmann 42531 Dummy Knuckle Coupler kit. |
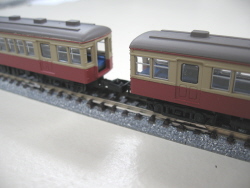 |
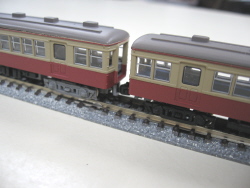
These particular models have a very wide gangway with no door. The long gap between cars makes this very obvious. The outward ends of the pair of cars feature nice small dummy couplers, but between the cars are clunky "rapido-style" couplers. The Bachmann pack contains three different pairs of couplers, and I swapped in the short shank ones with the "T"-shaped shank to bring the cars closer together with very little effort. Do not use any of the Tomytec coupler mounting extension pieces. This is a "before" picture, and the "after" picture is below. |
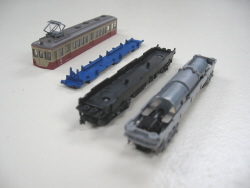 |
Use your fingernails to bow out the sides of the carbody. The plastic chassis and interior piece come right out. This power chassis comes with three types of sideframes and three different end extensions. Use the sideframes that match the dummy ones and the end pieces that fit best. The coupler box is mounted with a dovetail and comes off by lifting it upward from the truck. I was able to remove the boxes and replace them with shorter gray boxes from the kit (with the Bachmann couplers installed) without having to remove the trucks from the chassis. |
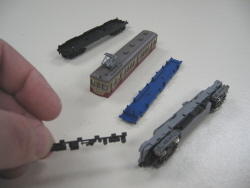 |
The underbody detail strips on either side of the chassis also can be pried off the chassis, to be clipped onto the power chassis. Be sure to keep these pieces and the interior in the correct orientation (front, back, left side, right side, etc.) Pry the small scale coupler and mounting box unit from the front of the dummy chassis and press it into the front of the power chassis. I will paint my power chassis and sideframes black, but for now the gray helps to show things better in these photos. |
 |
Here is the unpowered car. Simply add the weight between the plastic chassis and the interior floor/seat piece. Carefully remove the plastic wheelsets and replace them with the metal wheelsets. Replace the "rapido" coupler with a Bachmann knuckle coupler (note the short, gray mounting box), and reassemble the car. No glue is needed. |
 |
Here is the "after" picture, showing a much smaller open space between the pair of cars. I would like to close the distance more, but that would involve a lot more work. You could also buy two more cars and cut off their outward ends to splice into the interior ends of these cars, eliminating the large openings, but with more work and cost. I have used Bachmann and Red Caboose dummy knuckle couplers to easily close-couple many other N scale trains that came with "rapido" couplers. |
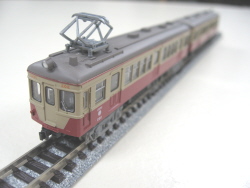 |
How simple can it be? The end result is a nice looking train that runs well, with eight-wheel drive, 6-wheel pickup (and two traction tires), and dual flywheels. This particular carshell features classic slightly-rounded ends (some Tomytec cars have absolutely flat ends), as well as cab doors on both sides (good for either left-side or right-side operation on double track). It would also be fairly simple to convert these cars to live overhead operation, with rewiring and adding a working metal pantograph. |


