


 |
The Chard Branches of the GWR and L&SWR |
 |
||||||
|
||||||||
This page describes the outline history and signalling of the separate railway branch lines to Chard which formed part of the Great Western Railway (GWR) and the London & South Western Railway (L&SWR). Some of the sources used for reference have contained conflicting information and it is regretted therefore that complete accuracy can not be guaranteed. A small bibliography is provided at the end.
A standard-gauge (4'8½") branch of the London & South Western Railway was opened to Chard on 8-May-1863 and this was the first railway to reach that town. This branch left the main Salisbury - Exeter line of the L&SWR at Chard Junction station (previously known as Chard Road) and ran to a new terminus at Chard Town station. This line was promoted by the independent Chard Railway company, but after construction had started they sold out in 1861 to the L&SWR, who worked the branch from the outset and finally dissolved the local company in 1864. Passenger services were essentially in the form of a shuttle between the Junction and Town stations. A tramway ran from Chard Town station to the nearby terminal basin of the Chard Canal.
The Bristol & Exeter Railway (B&ER) (later part of the Great Western Railway from 1876) opened their own branch three years later on 11-September-1866 and this line was built to the 7'0¼" broad gauge. The line had been promoted originally by the Chard & Taunton Railway company under an Act of Parliament of 1861, but the B&ER took control of the company in 1863 and started construction in 1864. This branch left the main Bristol - Exeter line of the B&ER at Creech Junction (east of Taunton) and ran south through stations at Hatch (Hatch Beauchamp) and Ilminster to a separate terminus in Chard about half a mile north of the L&SWR station. The B&ER had purchased and closed the Chard Canal and built its new Chard station on the site of the canal's terminal basin. A further station was opened in 1871 at Thornfalcon and in 1928 two halts were opened at Ilton and Donyatt. B&ER/GWR passenger services ran to and from their main station at Taunton. The GWR branch was converted from broad gauge to standard gauge in July 1891.
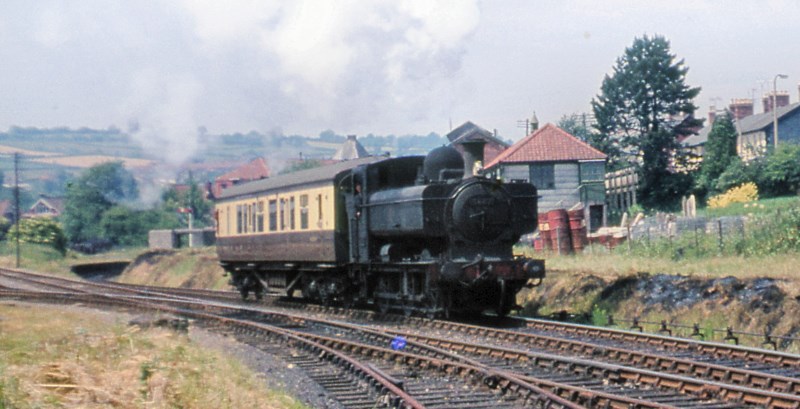
A train heading south from Chard Central station in 1962 and passing Chard Town yard
The L&SWR upgraded the former tramway to the canal basin and it was opened to passenger traffic on 26-November-1866 as a spur line to link the two separate railway termini in Chard. This spur diverged from the L&SWR branch at the approach to Chard Town station, thereby by-passing it, so at first all L&SWR trains which called at Chard Town had to reverse back out in order to continue their journey to the B&ER station (now renamed Chard Joint). However in 1871 the L&SWR constructed an extra platform on the new line behind their original station in order to serve those trains which now ran direct from Chard Junction to Chard Joint. At Chard Joint the L&SWR made an end-on junction with the B&ER, although through working was not possible until the broad gauge was converted by the GWR in 1891. The station at Chard Joint had one long main platform, situated on what later became the main through line, with a bay platform at each end, the GWR using the north bay (Taunton end) and the L&SWR using the south bay (Chard Junction end).
At the first the L&SWR and GWR ran their two lines completely independently of each other, even to the extent of each company having their own station-master and staff at Chard Joint. Any passengers wishing to travel the whole way between Taunton and Chard Junction would have to change trains at Chard Joint. However after the gauge conversion in 1891 the two companies began to work together and in 1896 the L&SWR station at Chard Town was placed under the control of the GWR stationmaster at Chard Joint, although the L&SWR still provided their own booking clerk. At the end of 1916 the L&SWR closed their station at Chard Town to passengers (including the second platform on the spur line) and from 1-January-1917 all passenger traffic at Chard was concentrated at the Joint station. The L&SWR withdrew their locomotives and coaching stock and thereafter the passenger service from Chard Joint to Chard Junction was worked by the GWR. At first this continued as a separate service from that over the GWR branch to Taunton, but in due course the GWR worked their Taunton trains right through to Chard Junction. Even so it was not uncommon for the timetable to include a long wait at Chard Joint before the train resumed its journey along the branch in either direction. On 1-March-1928 Chard Joint station was renamed simply Chard.
When British Railways (BR) was formed in 1948 the original L&SWR and GWR lines were allocated to BR Southern Region and BR Western Region respectively, but the Western Region operated the whole line as had been done previously by the GWR. Chard station was renamed Chard Central on 26-September-1949, but its signal-box was not renamed accordingly until 11-March-1950. In 1950 the Southern Region gained control of the whole branch from Thornfalcon southwards, although operation remained with the Western Region, and one visible result in due course was the renewal of some ex-GWR lower-quadrant signals by upper-quadrant (UQ) arms on rail-built posts of the Southern style. The Southern Region was responsible also for the subsequent renewal of the platform at Ilton halt as a precast concrete structure.
During a national fuel crisis in 1951 the line was closed temporarily on 3rd February and it did not re-open again until 7th May that year. On 23-September-1956 the goods loop and signal-box at Hatch station were taken out of use. As a result of the infamous Beeching Report passenger traffic ceased on the whole branch on 10-September-1962. Two years later on 6-July-1964 the line north of Chard Central was closed completely, all goods traffic then being worked to and from Chard Junction. All sidings at the former Chard Town station and its ground-frame were taken out of use on 28-July-1964 and thereafter all goods traffic was concentrated at Chard Central. The remainder of the branch was closed completely on 3-October-1966 and all the rails were lifted by December 1967. The first railway line to Chard, namely the ex-L&SWR line from Chard Junction, therefore became the last part to be closed.
| Stations & Halts etc | ||||||||||||
|
||||||||||||
There was no station originally at Creech Junction, which was located about 2½ miles east of Taunton station and faced towards Taunton. In 1928 the GWR opened Creech St Michael Halt there on their main line, but this was located east of the actual junction and therefore was not served by Chard branch trains. During its lifetime Creech Junction had three different signal-boxes, the third one (the largest, with 78 levers) being opened in 1931 when the main line was quadrupled. From here the branch line was regarded as being 'Up' to Chard Junction. A short distance up the branch there was a connection into Sommerville's private siding (also known as Creech Mills) and, after the line to Chard was closed in 1964, a short part of the former branch was retained to serve this siding until 1966.
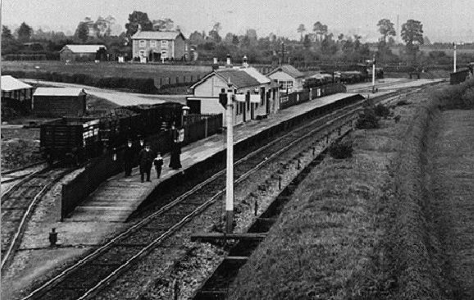
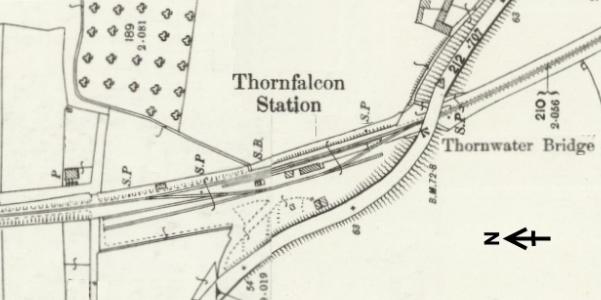
Thornfalcon station was located 1 mile 15 chains from Creech Junction; it was opened in 1871 as Thorne but renamed Thornfalcon on 1-January-1902. This was a simple station with a single platform on the Down (west) side of the line, apparently with pedestrian access at the south end via steps from the adjacent road overbridge. By the late 1880s (if not originally) a point at the north end, facing to Up trains, gave access to a couple of sidings behind the platform. By 1893 the platform had been lengthened at its north end and one siding extended as a loop around the back of the platform to connect back into the single line at the south end by a point facing to Down trains. It would appear that alteration resulted in the shortening of the platform at the south end and the abolition of the steps to the road, after which pedestrian access was simply on the level across the loop siding to the rear of the platform. The station building was a simple wooden affair, in contrast to the substantial brick buildings provided at the three original B&ER stations; no goods shed was provided at Thornfalcon.
 |
 |
|
| Thornfalcon station looking north circa-1905 | Map of Thornfalcon station in 1904 |
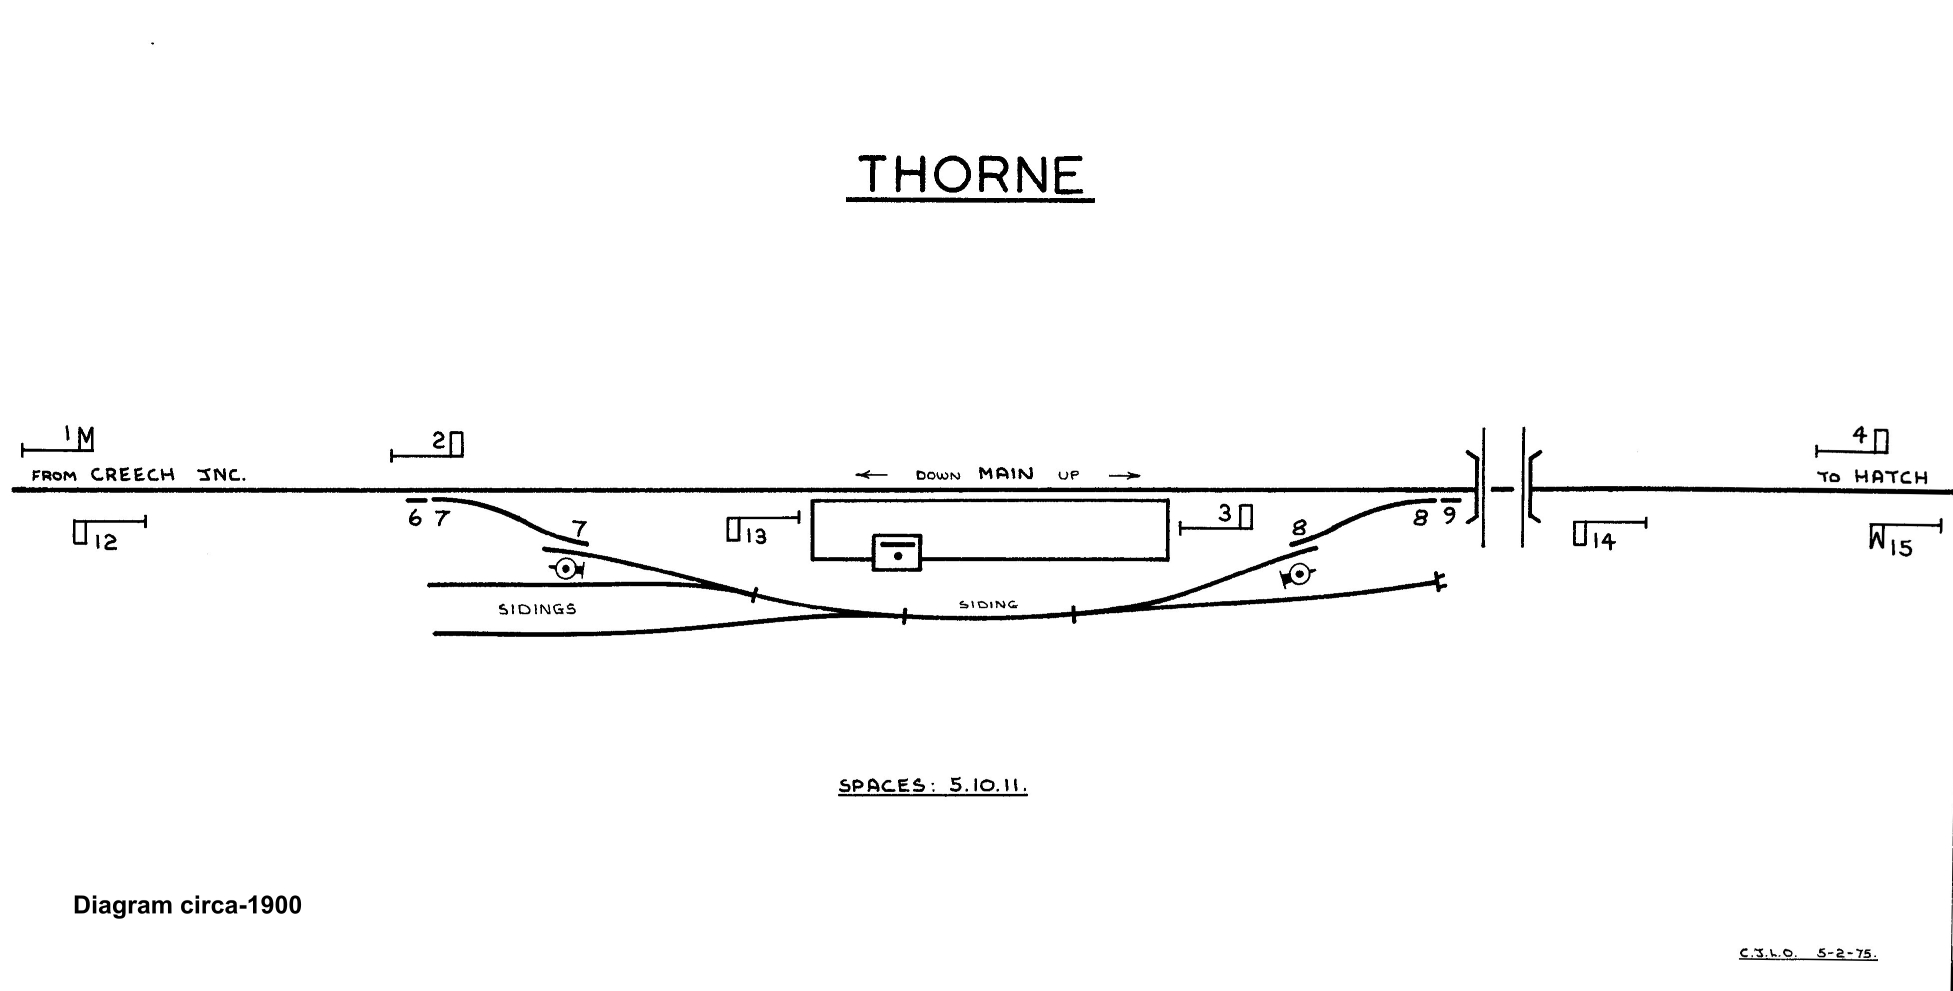
Nothing is known about the signalling arrangements for the original layout, but in 1892 a small 15-lever signal-box was opened at the rear of the north end of the platform and this may have coincided with the layout alteration. However the signal-box was an early victim of economy measures and it was closed circa-1912; all signals were removed and two new ground-frames (Thornfalcon North and Thornfalcon South) were provided, one at each end of the loop siding on the Up side of the line. Each ground-frame (GF) had two levers; at the South GF lever 1 worked the facing point lock (FPL) and lever 2 worked the points, but the functions were reversed at the North GF. At both GFs a 'point disc' was provided for the trap-point at the exit from the siding. Both GFs were fitted with two locks, so that they could be unlocked by either the 'short section' staff or the 'long section' tablet depending upon the single-line block working in force at the time (click here for more details).
 |
 |
|
| Thorne Signal Diagram circa-1900 Click diagram for larger image |
Hatch Signal Diagram circa-1953 Click diagram for larger image |
Hatch station was located at 4m 12c from Creech Junction, a short distance south of the 152-yard Hatch tunnel which had been built to accommodate double-track. By the mid-1880s the station had a single platform on the Down side, with a goods loop opposite it on the Up side, and a large goods shed also on the Down side with sidings accessed from the south end. Although the 1888 Ordnance Survey map (shown below) marks a signal-box 'SB' on the Up side of the goods loop, nothing is known about this structure or the signalling arrangements at that time. However a new 29-lever signal-box was opened in 1892 and this was also situated on the Up side of the goods loop, but a few yards further south from the previous 'SB' and directly opposite the goods shed.
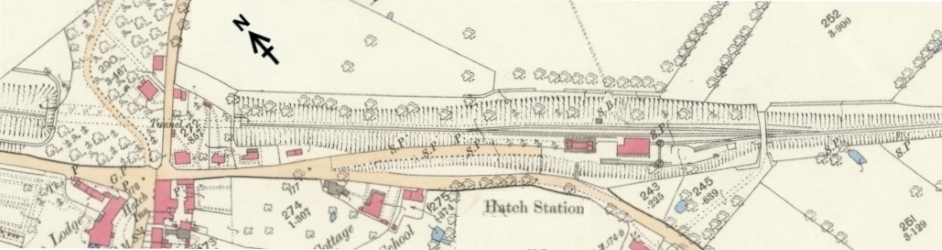
Map of Hatch station in 1888
By 1894 the loop at Hatch had been lengthened at both ends and the siding arrangements were altered; a new connection off the main line facing to Up trains was added close to the goods shed and the existing Down-facing connection was moved further south of the over-bridge, which now had a separate arch added over the sidings. These alterations had taken place in the early 1890s and were probably the reason for the new signal-box. The station layout was not designed for two passenger trains to cross, as the loop was not signalled for use by trains carrying passengers; however it was possible to cross two goods trains, or one passenger train and one goods train, provided that the passenger train always used the main (platform) line (see 1953 signal diagram above). About 1908 this signal-box was provided with 'switching out' facilities, enabling it to be closed during quiet periods, at which times Creech Junction to Ilminster would be worked as a single 'long' section and all trains would use the main (platform) line (click here to see a 1954 copy of the Mechanical Locking table).
For most of its life the Up Starting signal (26) was located just on the station side of the road over-bridge. In addition to shunt signal 21, which controlled movements from the main line into the yard across points 15, there was another shunt signal 27 which was positioned on the opposite (up) side of the main line at points 15 and controlled movements straight ahead from the platform towards signal 26. In mid-1953 the Southern Region abolished shunt signal 27, renewed signal 26 as an UQ arm on a rail-built post and relocated it 83 yards closer to the signal-box to the position just in rear of point 15 shown in the 1953 signal diagram above (BR Weekly Notice K2/213). At the same time the Down Advanced Starting signal (6) was also renewed as an UQ arm on a rail-built post in its existing position, but reduced in height to 15½ feet. In mid-1954 the northern (Up facing) connection into the goods yard was abolished and points 15 and shunt signals 3 and 21 were removed (BR(WR)Weekly Notice K2/263). The signal-box was closed on 23-September-1956 (Weekly Notice K2/362/56) and the goods loop and all signals abolished; the remaining (southern) connection to the sidings was controlled thereafter by a new 2-lever GF at the south end, which was unlocked by the token for the single-line section (click here for more details).
Spekes Wood was a manned level-crossing over a minor road about 6½ miles from Creech Junction and apparently was known originally as Ashill crossing. The crossing-keeper was provided with a two-storey brick house, built in the same style as the original station buildings on the line. This crossing had a pair of hand-operated gates with lamps and targets and it was protected by Up and Down Distant signals controlled from a 3-lever GF. (It is believed that in Southern Region days these signals were renewed with UQ arms on rail-built posts.) The GF was installed in a typical GWR small wooden hut sited on the Up side of the line on the Chard side of the crossing with the lever-frame mounted 'back-to-track'. Arm and lamp repeaters were provided for both signals. The lever functions and signal distances from the GF were as follows:-
|
|
|
Ilton and Donyatt halts were opened on either side of Ilminster in 1928, on 26th May and 5th May respectively. Ilton comprised a single platform located on the up side of the line 7 miles 39 chains from Creech Junction, whilst the platform at Donyatt was on the down side at 9 miles 44 chains. The platform at Donyatt was constructed from a timber front wall (probably old sleepers) with earth infill behind, whereas Ilton had a wooden surface on an open structure of wooden trestles which the Southern Region replaced completely in late 1954 with a modern structure made from pre-cast concrete sections. There was a simple wooden shelter on the platform at Donyatt, whereas at Ilton a similar shelter was placed alongside the approach footpath from the road. After the railway had closed the concrete platform at Ilton was dismantled and then used to construct Cranmore West halt on the private East Somerset Railway.
Map of Ilminster station in 1887
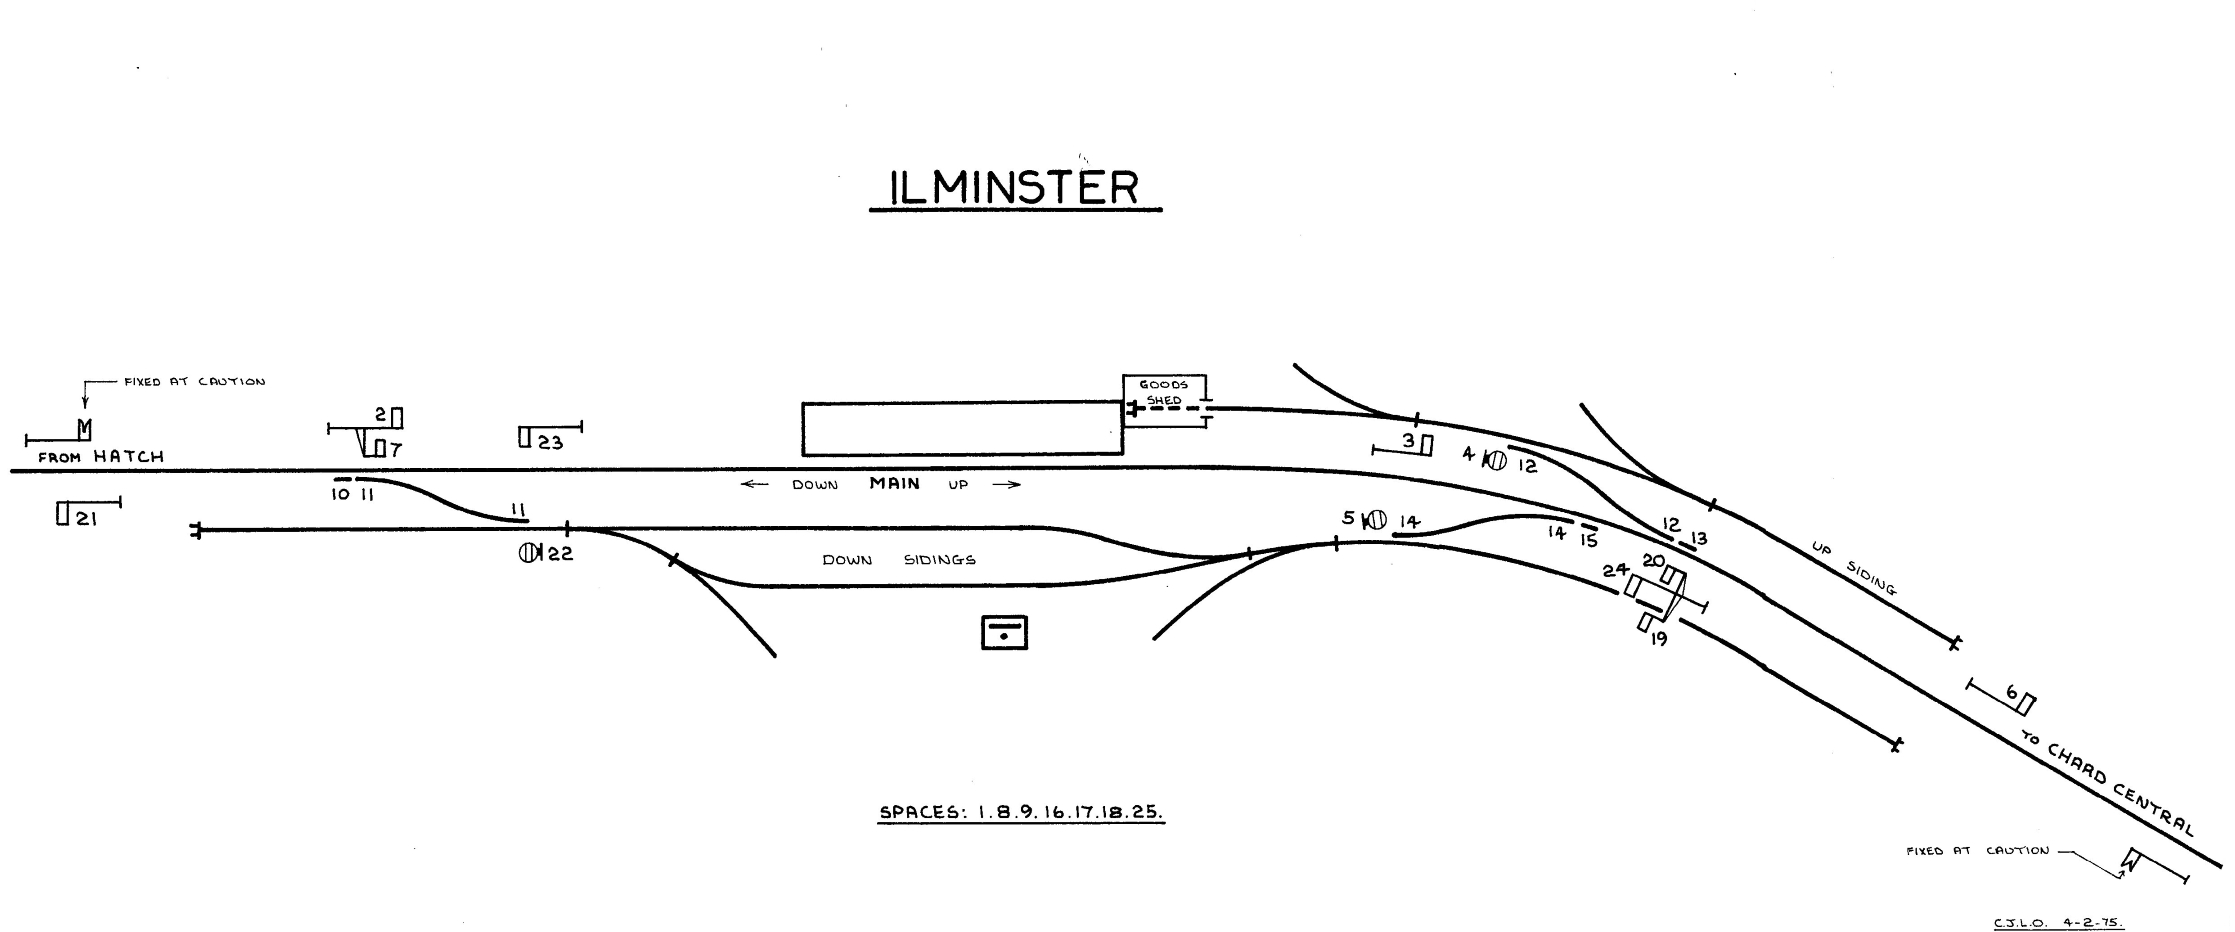
Ilminster station was sited 8m 65c from Creech Junction. Its basic layout was similar to the arrangements at Hatch, in that there was only a single platform and a goods-only loop, so the same restrictions applied concerning the crossing of passenger and goods trains. However the platform at Ilminster was on the Up side, along with the goods shed and some sidings, with the goods loop and more sidings on the Down side. The 25-lever signal-box was ordered in May 1891, so it was probably opened later that year or early in 1892; it stood in the yard about mid-way along the loop opposite the station building. By 1902 the loop had been lengthened at the Chard end and head-shunts added at both ends as well as an extra siding, so it is possible that these alterations had taken place in the early 1890s and were the reason for the new signal-box. On 16-May-1963 the Down Homes bracket signal was replaced by a straight post bearing the main Down Home arm (24) and a double-disc to replace arms 19 and 20. Click here to see a 1950 copy of the Mechanical Locking table.
 |
 |
|
| Ilminster Signal Diagram circa-1950 Click diagram for larger image |
Chard Signal Diagram circa-1930 Click diagram for larger image |
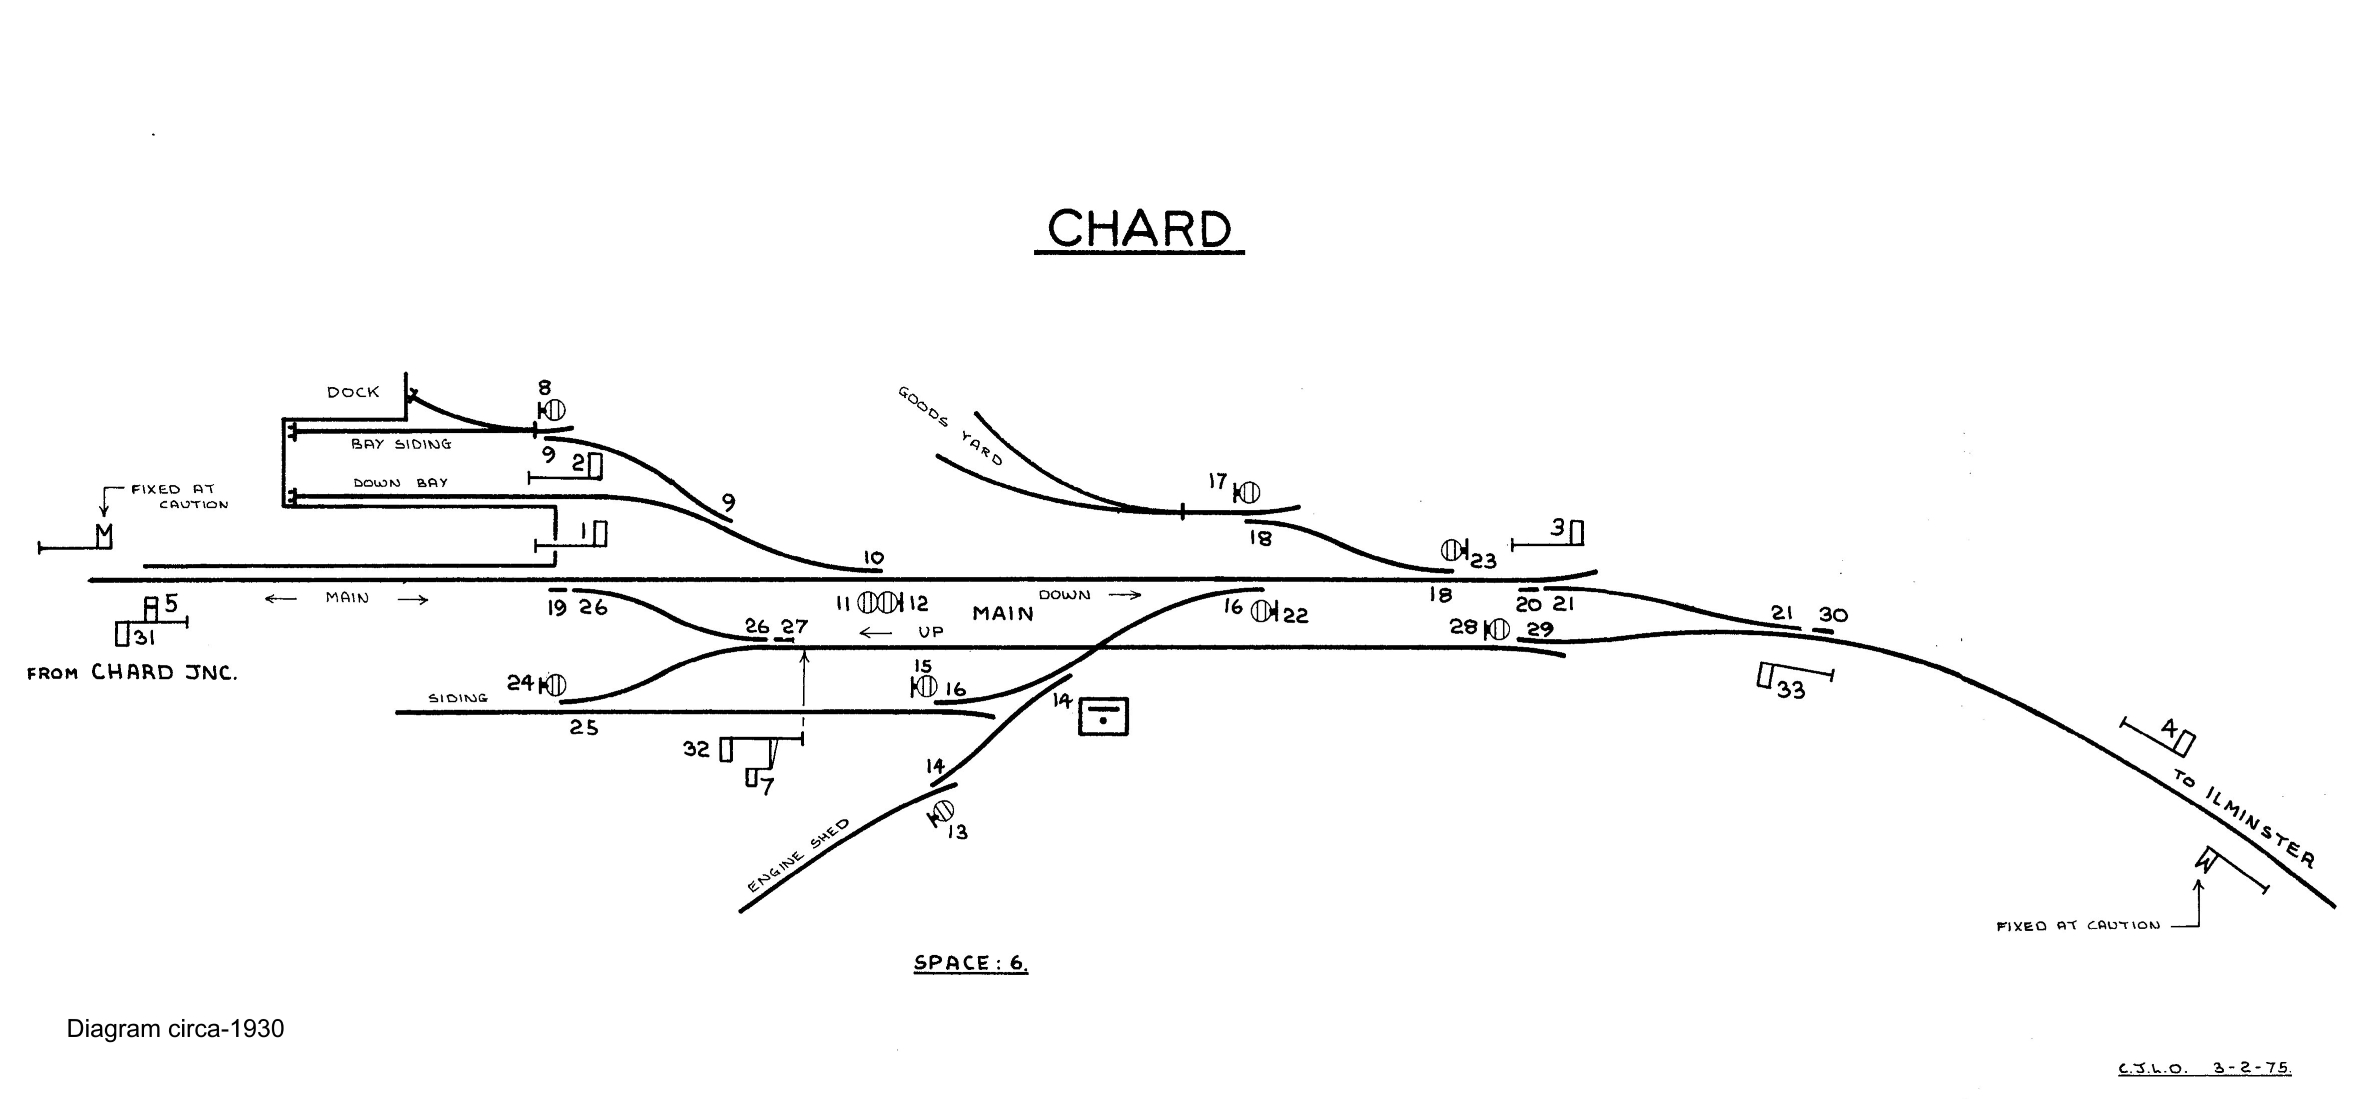
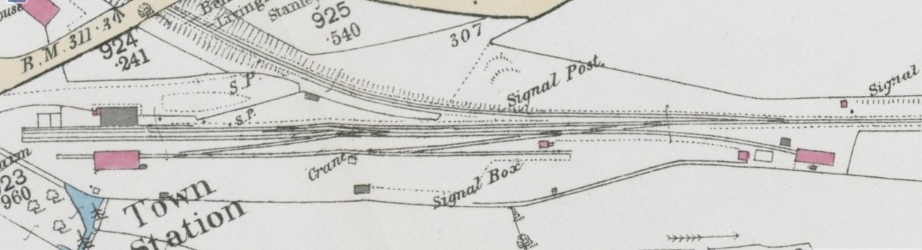
Chard Joint station was located 12m 63 from Creech Junction, with a passing loop at the approach to the north end of the station that could be used by two passenger trains. The main platform was on the Down side of the line and originally had bays at each end. The north bay was used by GWR trains and was signalled for departure only; the bay at the south end was used by the L&SWR, but it is probable that it ceased to be used for passenger traffic in 1917 and it was removed altogether in 1927. A loop siding ran the length of the station on the Up side and this gave access to a turntable, which was used by both the GWR and L&SWR engines; originally there were separate broad and standard gauge connections to the turntable (which was mixed-gauge), but after the 1891 gauge conversion the connection at the south end was removed. The GWR had their own engine shed at the north end of the station on the Up side, but this was closed on 14-July-1924 (National Archives (TNA) file RAIL253/263). The engine shed siding was taken out of use in 1933, with points 16 and shunt signal 15 being abolished on 6-December-1933 (TNA file RAIL258/232) and the relevant levers were removed from the signal-box lever-frame. The turntable and its remaining connection were removed circa-1935.
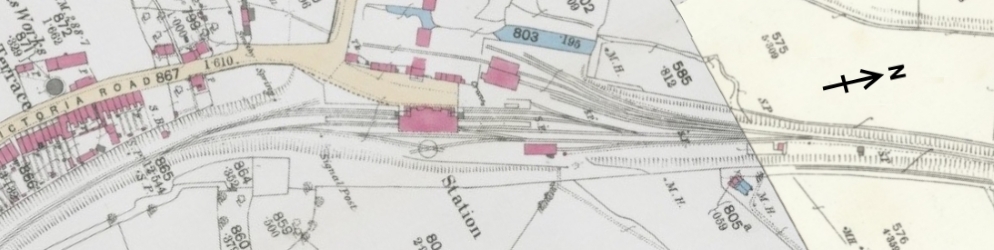
Map of Chard Joint station in 1889
The GWR built signal-boxes at both ends of the station: Chard North was opened in 1892 and Chard South in 1896. It would appear that the South box replaced an earlier L&SWR signal-box at that end, but currently few details are known about the precise signalling arrangements at the south end. Chard South signal-box was closed on 1-January-1917 (although the structure appears to have survived until at least 1928) and thereafter the North box worked the whole station. (According to GWR Notice 311 of 1916 the former North box was to be known henceforth as Chard Joint.) Two 2-lever GFs (North and South) were opened at the south end of the station; the North GF (on the Up side of the line) controlled the connection from the single line to the loop alongside the main platform, while the South GF (on the Down side of the line) controlled the connection into the former L&SWR bay platform. Both GFs had two levers, with one lever working the FPL and the other lever the facing point and associated trap-point, and each trap-point was equipped with a point disc. The South GF was abolished in 1927 along with the lines into the ex-L&SWR bay. Both GFs were unlocked initially by the tablet for the Chard Joint - Chard Junction section, but from 1935 the remaining (North) GF was unlocked by a key on the train-staff (click here for more on the single-line block working). A plan was prepared in 1939 to abolish the GF and its pointwork, with the siding becoming a dead-end at its south end, and it is believed that this work was done by or during 1942.
When the signal-box was renamed Chard Central on 11-March-1950 its new nameplate was of the smaller pressed aluminium style then used by the Western Region. In October/November 1951 (Weekly Notice K2/129) the connection from the Down Main to the Up Siding (points 16) was removed and shunt signals 15 and 22 were abolished. At the same time the bracket signal carrying arms 7 & 32 was removed and a replacement Up Main Starting (No 32) was provided 17 yards closer to the signal-box as an UQ arm on a straight rail-built post 14½' high, at the foot of which was a new ground signal 7. The Up Siding was now a dead-end at both ends, accessed only by the facing connection from the Up Main over points 25 and 26. Further signal alterations took place in late August or early September 1955 (Weekly Notice K2/314) when the following signals were renewed on their existing sites but reduced in height to 14'6":- Down Main Starting (No 3), Down Main Advanced Starting (No 4), Up Main Advanced Starting (No 31). Although not specified in the Notice it is assumed that it was at that time that those signals were converted to UQ arms on rail-built posts, as seen in later photographs. The Up Main Distant was renewed and reduced in height to 13'6" at the same time, but no photograph of that signal is known.
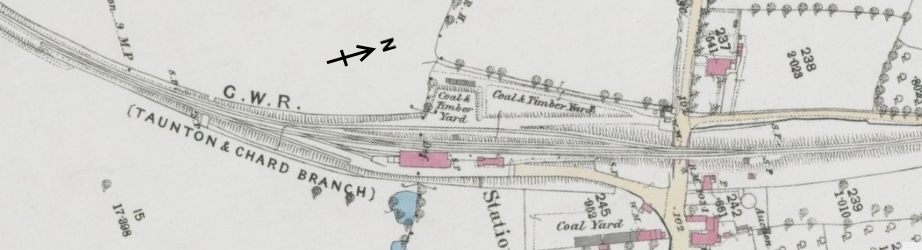
Map of Chard Town station in 1891
The L&SWR terminus at Chard Town had a single platform, a small goods yard with goods shed, an engine shed and a signal-box. In 1871 a second platform was built behind the station on the link line to Chard Joint and the boundary between the GWR and L&SWR lines was just north of that second platform at 13m 8c from Creech Junction and 2m 79c from Chard Junction. The buffer stop at the end of the original platform road in the Town station was 3m 5c from Chard Junction. An additional siding was added behind the goods shed at a later date, possibly in the 1890s. Both the original station and the link line platform were closed to all passenger traffic on a date given variously as 30-December-1916 or 1-January-1917 and thereafter the station was retained for goods traffic only.
The signal-box was closed on 30-December-1916, all the points in the station area were converted to hand-operation and all the signals removed; sadly no numbered signal diagram has survived. A new 2-lever GF was installed to work the connection between the station area and the link line, which now became the main single-line between Chard Junction and Chard Joint, with a new trap-road at the exit from the Town yard. The GF was located on the Up side of the single-line adjacent to the points; lever 1 worked the facing point lock and lever 2 worked the points. Initially the GF was unlocked by the tablet for the single-line section, but from 1935 this was replaced by a key on the train-staff (see below for more on the single-line block working). The old engine shed was taken out of use about 1920 and removed in November 1929, and there were other minor alterations to the layout of the sidings in later years.
At Chard Junction the branch had its own separate platform at the back of the main station and also its own ground-level signal-box in addition to another signal-box which controlled the L&SWR main line. The physical connection between the main and branch lines was achieved through the goods yard and was not signalled for normal passenger traffic, although occasionally some excursions were shunted that way (which required the hand-points in the yard to be clipped). The branch signal-box was reduced to GF status on 5-March-1935, when the signals were removed and the block working on the single-line section to Chard (Joint) was reduced to One-Engine-in-Steam (OES) working, after which the GF was unlocked by a key on the OES staff.
Information about the early block working on the two branches is incomplete, but according to the 1886 GWR Working Timetable (WTT) the entire broad-gauge line to Chard was worked by the Train Staff & Ticket (TS&T) system as a single section with a round red staff. By the early 1890s the GWR line had been split into two T&ST sections:- Creech Junction - Ilminster with a round red staff and Ilminster - Chard with a square white staff. Despite the opening of a signal-box at Hatch in 1892 this arrangement remained unchanged until at least the 1902 WTT, but it is possible that Hatch functioned as an intermediate block post. However Hatch appears to have become a staff post circa-1908, after which there were three TS&T sections:- Creech Junction - Hatch (triangular blue), Hatch - Ilminster (hexagonal green) and Ilminster - Chard North (square white). At the same time the signal-box at Hatch was fitted with 'switching out' facilities, providing for a new 'long section' Creech Junction - Ilminster with a round red staff (click for pictures of the train staff and its ticket box and also the key which unlocked the ticket box). On 6-April-1911 the TS&T working on the GWR branch was replaced by Electric Train Staff (ETS), except that the Creech Junction - Ilminster 'long section' became one of the rare GWR locations to be equipped with Electric Train Tablet (ETT) (using the Tyer's No 7 pattern). Nothing is known about the working between the original GWR and L&SWR boxes at Chard Joint or the subsequent Chard North and Chard South boxes.
On the L&SWR line by mid-1892 there was a single TS&T section (with a round red staff) which extended from Chard Junction to both Chard Town and Chard Joint (L&SWR Instruction No 88 of 1892). Sometime between 1897 and 1909 (believed to have been in 1898) this was changed to ETT working between Chard Junction and Chard Town using Tyer's No 6 instruments, with TS&T working between Chard Town and Chard South. After the closure of Chard Town and Chard South boxes with effect from 1-January-1917 the section became Chard Junction - Chard Joint using Tyer's No 6 ETT instruments.
By about 1930 therefore the block sections were as follows:
| Creech Junction - Hatch | Electric Train Staff | Short Section |  |
|||
| Hatch - Ilminster | Electric Train Staff | Short Section | ||||
| Creech Junction - Ilminster | Electric Train Tablet | Long Section Config 'A' |
||||
| Ilminster - Chard | Electric Train Staff | Config 'A' | ||||
| Chard - Chard Junction | Electric Train Tablet | Long Section |
About 1935 the ETT working on the Creech Junction - Ilminster 'long' section was replaced in turn by Electric Key Token (EKT), but the 'short' sections remained as ETS. When Hatch signal-box was closed in 1956 the two 'short sections' and their ETS equipment were taken out of use, EKT being retained to work the remaining Creech Junction - Ilminster section.
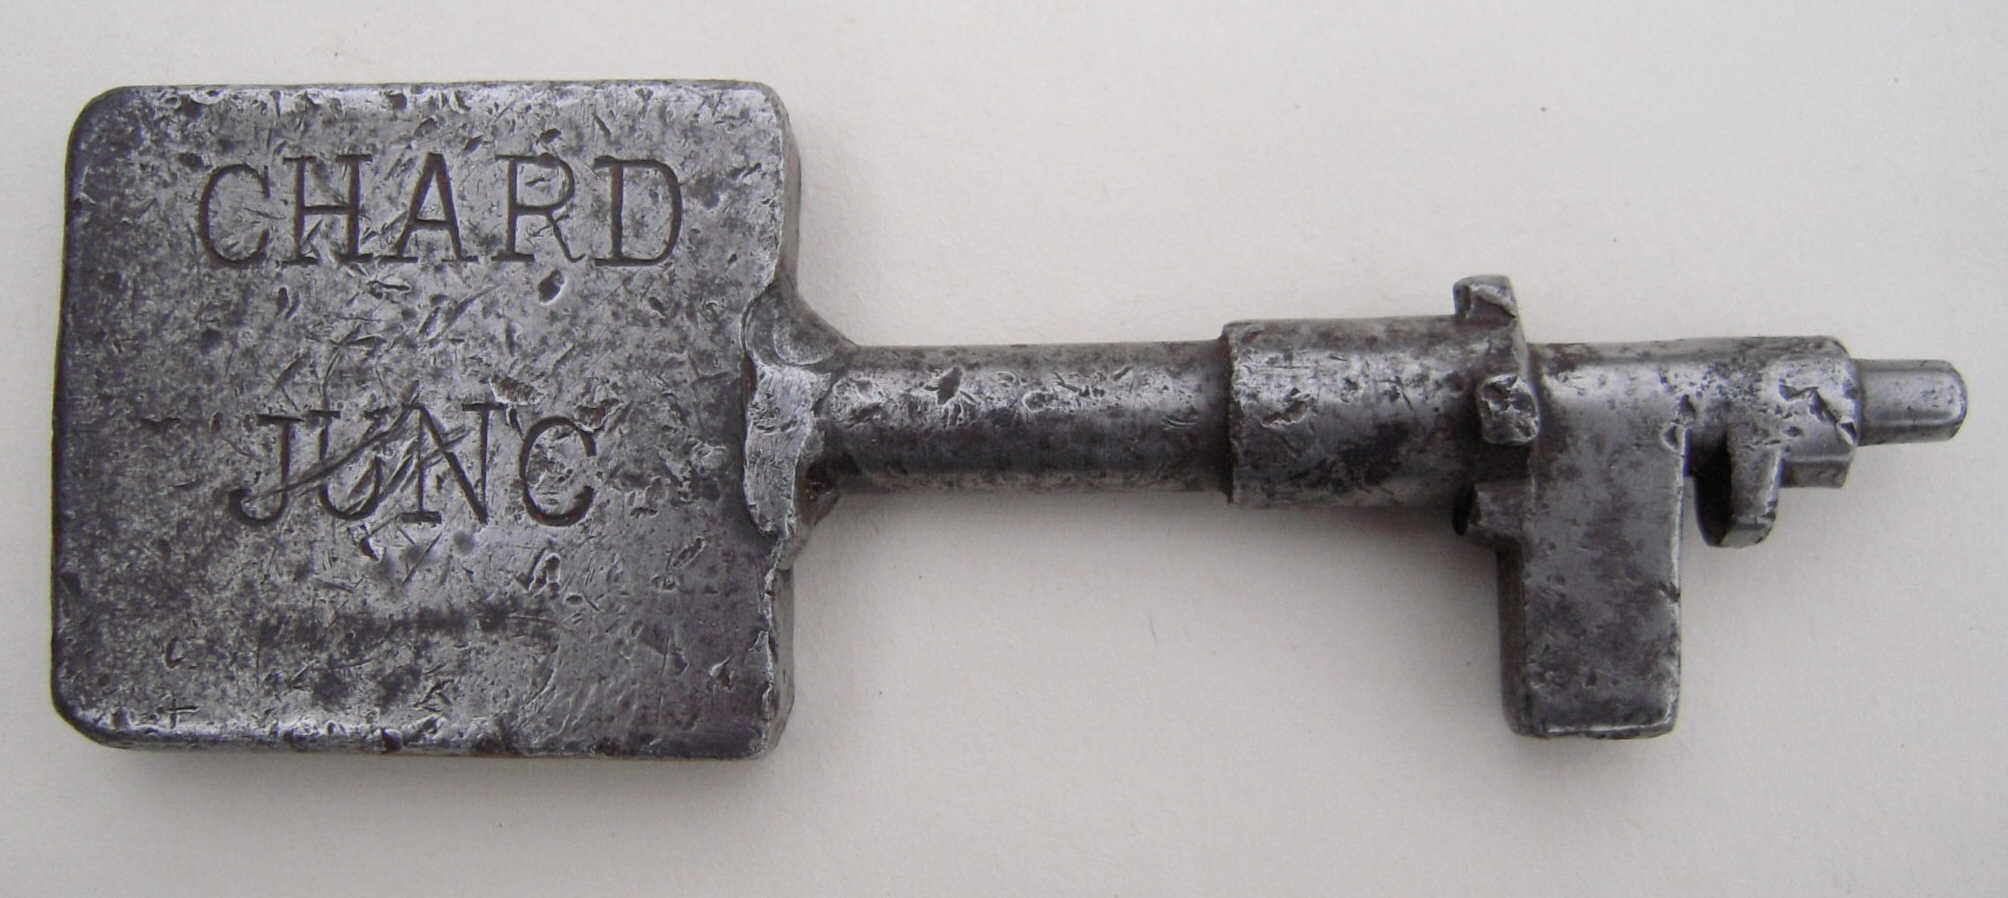
In 1935 the ETT working on the ex-L&SWR line between Chard Junction and Chard (Joint) was superseded by One-Engine-in-Steam, with the train staff being kept at Chard (Joint) signal-box. This 'staff' took the form of a large metal key, which for ease of handling was put in a hooped pouch similar to that used with the GWR automatic token exchange apparatus on the nearby Barnstaple and Minehead branches. The key was used to unlock the GF at the south end of Chard (Joint), the GF at the entrance to Chard Town goods yard and the 'Branch' GF at Chard Junction. Curiously the staff bore only the name "Chard Junc" on both sides of the handle with no mention of Chard (Joint) as the other end of the block section.
 |
 |
|
| Chard Junction - Chard OES staff and pouch | ||
| Click on the thumbnails to see larger images | ||
The GWR branch from Creech Junction to Chard Joint was one of the many single-track lines on which the GWR used their 'Economic' method of permanent-way (PW) maintenance. This name arose because it used the GWR's Occupation Key system to avoid the need to have dedicated look-out men provided to protect the PW gang during work on the track, thereby reducing the size of the work-force. (The system also became known as the 'Motor Trolley' system, because of the small motorised rail trolleys provided to the PW gangs to enable them to travel along the line to their work locations.) By the late-1940s the maintenance of the GWR Branch was under the control of a Ganger based at Chard, assisted by two Sub-Gangers in charge of separate PW gangs based at Hatch and Chard. The Hatch gang maintained the line from Creech Junction to a point roughly mid-way between Hatch and Ilminster (6 miles 68½ chains from Creech Junction), whilst the Chard gang maintained the rest of the line to a point just short of Chard Town (13m 8c). It is presumed that the rest of the line to Chard Junction was the responsibility of the Southern Railway.
Under the GWR Occupation Key system a single-track line was divided into a numbers of sections which usually - but not always - corresponded with the staff or token section for block working. A number of Occupation Key Instruments would be installed at various locations through the section, including usually one in the signal-box at each end. All these Key Instruments would be connected together electrically and also to a single Occupation Control Instrument in the signal-box at one end of the section only.
 For each group of Key Instruments there would be a
single Occupation Key, which could be inserted into any of the Key Instruments; this key
normally resided in whichever Key Instrument was most convenient to the
Permanent Way 'ganger'. By the late-1940s the Chard Branch was divided into three Occupation Key groups as follows:-
For each group of Key Instruments there would be a
single Occupation Key, which could be inserted into any of the Key Instruments; this key
normally resided in whichever Key Instrument was most convenient to the
Permanent Way 'ganger'. By the late-1940s the Chard Branch was divided into three Occupation Key groups as follows:-
| Group 1 | Creech Junction - Hatch | 7 Key Boxes | ||
| Group 2 | Hatch - Ilminster | 7 Key Boxes | ||
| Group 3 | Ilminster - Chard | 6 Key Boxes |
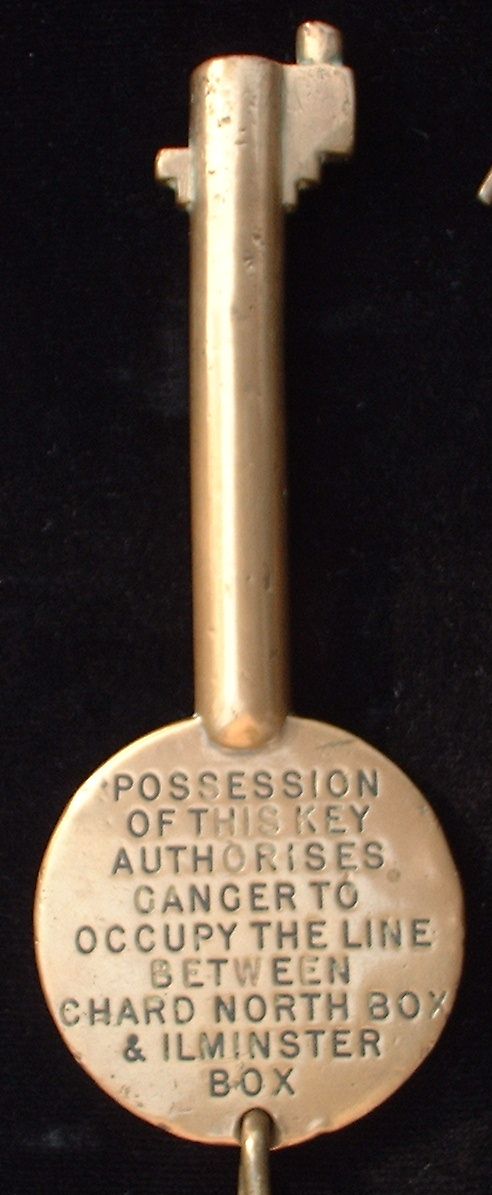
Each Group was controlled by a Control Instrument in the first-named signal-box, but when Hatch signal-box was 'switched-out' then control of Group 2 passed to Creech Junction. The illustration (click for a larger image) shows an Occupation Key from the Chard - Ilminster group; note that it is sufficiently old enough to refer to Chard North.
When the PW ganger required occupation of the line between trains in order to carry out maintenance work, then he would ask the relevant signalman to operate the Control Instrument so that he could remove the Occupation Key from its Key Instrument. The operation of the Control Instrument locked-up the ETS/EKT equipment for that block section, thereby preventing the signalman from withdrawing a staff or token for a train. As long as the PW ganger was in possession of the Occupation Key no train could enter the single-line section, so therefore it was safe for the PW workmen to be on the track without the need for 'look-out' men. When the PW work was complete, or the signalman needed to clear the line for a train, then the Occupation Key could be replaced by the ganger into the nearest convenient Key Instrument without the need for him to go all the way back to the signal-box. The signalman then would reset his Control Instrument, thereby locking the Occupation Key inside the Key Instrument and releasing the ETS/EKT instruments for the block section.
| Creech Junction |
|
||||||
| Thorne | Opened 1892, closed circa-1912. GWR Type 5 platform-level box 16’1”x 11’. 15-lever frame, non-block post. Renamed 'Thornfalcon' 1-Jan-1902. Replaced by 'North' and 'South' 2-lever GFs, unlocked by ETS/ETT. | ||||||
| Hatch | GWR Type 5 opened 1892, closed 23-Sep-1956. 20’3”x11’6”x8’. 29-lever frame. Closing switch provided circa-1912. | ||||||
| Ilminster | GWR Type 5 ordered May-1891, closed 6-July-1964. 18’6”x12’x11’. 25-lever 5¼” DT frame. | ||||||
| Chard (North) | GWR Type 5 opened 1892, closed 28-July-1964. 25’5”x12’x10’6”. Originally 36 levers, frame replaced 1916 by 33-lever 5¼” 3-bar HT frame (second-hand). Box believed to have been renamed 'Chard Joint' 1-Jan-1917, 'Chard' 9-July-1923 and 'Chard Central' 11-Mar-1950. | ||||||
| Chard South | GWR Type 5 opened 1896, closed 1-Jan-1917. 25’1”x12’. 25 levers. Replaced by two 2-lever GFs, but box structure survived until at least 1928. This box replaced an earlier L&SWR box about which little is known. | ||||||
| Chard Town | Box details unknown (possibly L&SWR Type 1). Box closed 30-Dec-1916 and replaced by 2-lever Stevens 'knee' GF working connection from branch into former Town station yard. GF unlocked by ETT (later OES staff). | ||||||
| Chard Junction (Branch) | L&SWR Type 5 ground-level box opened circa-1899 with 14-lever Stevens 4.5/8" 'knee' pattern frame. Reduced to GF status 5-Mar-1935 and closed 28-July-1964. | ||||||
| Chard Junction (Main Line) | L&SWR Type 1 opened circa-1874 with 15-lever
Stevens 4.1/8" pattern frame. Box closed 11-Sep-1982 and demolished
and replaced by a panel
in a modern box
built on the same site and opened 11-Dec-1982 (a temporary box and panel
were provided on another site in the interim period). The panel was replaced
in 2009 and the box closed in 2012. (NOTE: The main line box was not involved with the operation of the branch, but these details have been included for information.) |
© CJL Osment 2002-20.
With acknowledgement to Ian Harrison for much useful information from his book [1]. Train photograph courtesy Mike Morant collection, single-line equipment photographs courtesy David Hayball, maps reproduced with permission of the
National Library of Scotland, locking tables courtesy
Signalling Record Society.
| © West Country Railway Archives 2002 Page last updated: 12 October 2020 |
URL: http://www.railwest.org.uk E-Mail: railwest@bigfoot.com |
||||||


