This page will present the operational aspects of the lights as a function of the wiring circuitry used.�
The following photos are of the Pyle-National 20380 Control used in diagrams below:
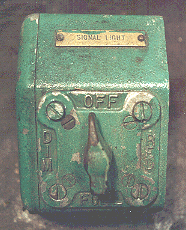
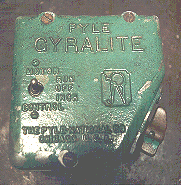
Assortment of Control Labels

The following photos by Gary Riccio show a Mars Light Control which may have been used on the ACL:


The wording in the
middle of the above back-plate is:
�U.S. PATENTS 2439474, 2456286
� OTHERS PENDING�
���� US Pat. 2,439,474 = BRAKE PRESSURE RESPONSIVE SIGNAL
SYSTEM issued to J.D. Kennelly on April 13, 1948
���� US Pat. 2,456,286 = LOW BRAKE
PRESSURE SIGNAL DEVICE issued to J.D. Kennelly on December 14, 1948

other side of above
back-plate
A 20585 Gyralite or a SBW-2-300 Mars Light operating with both lights on (no Red lens) involves less complicated circuitry than one that has both White and Red modes.
The first set of diagrams will illustrate how the controls and relays in a dual Red-White unit operate in a coordinated way to make operator interaction minimal. This is advantageous, as a series of operations are performed that get the desired warning light into operation quickly while the engineer is attending to other areas of the emergency.
There is an importance of extinguishing the
locomotive headlights as well as other White lights on energizing the Red
oscillating light:
I made the following candela measurements on a GE 200PAR 30V 200W locomotive
bulb at a measured voltage of 27V. The maximum candela reading of the light was
193.000. On placing a Red Gyralite glass roundel in front of the bulb, the
reading decreased to 33,000-35,000 candela. It should be noted that this was a
clean roundel (a condition that might not be found on a locomotive). The light
output of the Red is 1/6 of that of the White output. Having the locomotive's
White lights ON would tend to mitigate the output effectiveness of the Red.
I have taken schematics and put the contacts and coils of the relays together to show the operational aspects.
In these diagrams:
bulbs are 200PAR (30V 200W PAR-56)
R = RED (200PAR bulb with red lens)
W = WHITE
M = MOTOR

1. Control set to RED
2. Motor set to RUN
In this situation the current travels through the Red Control Relay (RCR), the Red bulb and the voltage dropping resistor.
Current through the RCR causes the coil to be energized, pulling the core in
and thereby doing the following:��������������������������� 1) The motor is cut off from the
control and starts the oscillation of the light.����
2) The Pilot bulb is illuminated in the cab, showing the Red bulb to be
operational and ON.

This system uses 2 relays to accomplish the task of one. This is most likely
due to product availability and the currents realized in the coil of the relay
in series with the Red bulb.
1) Control set to FULL
2) Motor set to RUN
In this situation, neither of the coils of the Red Control Relays (RCR) are energized. The White bulb and Motor get current through the normally closed contacts of the 4PDT RCR.
If the control was selected to RED, the SPST RCR would activate the 4PDT RCR
and the following would occur:
1) The motor is cut off from the control and starts the oscillation of the
bulb.
2) The Pilot bulb is illuminated in the cab, showing the Red bulb to be
operational and ON.
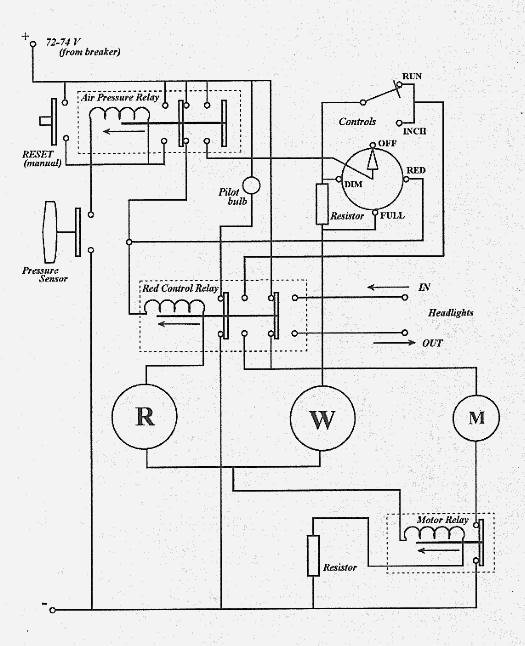
This system shows how an automatic air pressure sensor in the locomotive's
brake line is used to operate the Red emergency lighting functions. This
diagram shows:
1) Control set to OFF
2) Pressure Sensor contacts OPEN due to a drop in brake line pressure.
This system involves 3 relays. The Red Control Relay (RCR) and the Motor Relay (MR) are located in the case of the Gyralite or Mars Light. The Air Pressure Relay (APR) is located outside the case of the light unit.
In this instance, opening the Pressure Sensor contacts causes the coil of
APR to de-energize, which does the following:
1) causes current to travel from supply voltage through coil RCR, through the
Red bulb, and through the coil of the Motor Relay (MR).
2) the power supply to the Controls is cut OFF.
Energizing coil RCR causes:
1) Pilot bulb in cab to be illuminated
2) Motor to be connected to supply voltage (MR controls completion of circuit -
see below).
3) Headlights to be extinguished.
Energizing MR causes completion of the circuit through the motor and the light is in full operation.
It should be noted that even if the air pressure is restored and the contacts of the Pressure Sensor close, the light will remain ON and oscillating.
There is a set of contacts in the APR that will complete the circuit through the APR coil and HOLD the relay core in that position if the RESET switch is activated - just to pull the core into the relay coil. This will reset the system and stop the RED� mode of operation.
This diagram illustrates the SP Gyralite package (dual Clear Gyralite with a single Red Gyralite). The Manual Transfer Switch is shown - which supplies voltage to either Front or Rear Gyralites. The control is in the "OFF" setting and the Pressure Sensor contacts are closed. In this situation, BOTH Gyralites are OFF.

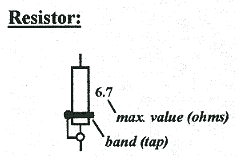
The resistors shown in this diagram are just another symbol representation. The symbol illustrates the adjusting band that is set at specified voltage settings for the High and Dim settings of the control. The voltage could be read across the resistor(s) or across the bulb terminals (which would take any line voltage drop from resistors to the bulbs into account).
If the Pressure Sensor contacts opened, the Air Pressure Relay coil would be de-energized causing the contacts supplying voltage to the Controls to open. Both Front and Rear single Gyralite would be energized. The effect is that the dual Clear Gyralites would no longer be operational
There should be a SPST relay in each leg of the single Gyralite supply which could be a normally closed relay. The contacts of this relay would be connected in series with the headlights to assure that the headlights would be extinguished on operation of the single Red Gyralites. (The original schematic did not show this interface).
Another point:
In this diagram the Pilot bulb would only be illuminated on manual selection of
the Red via the control. There was no provision here for an indicator to be
illuminated on a low pressure situation.
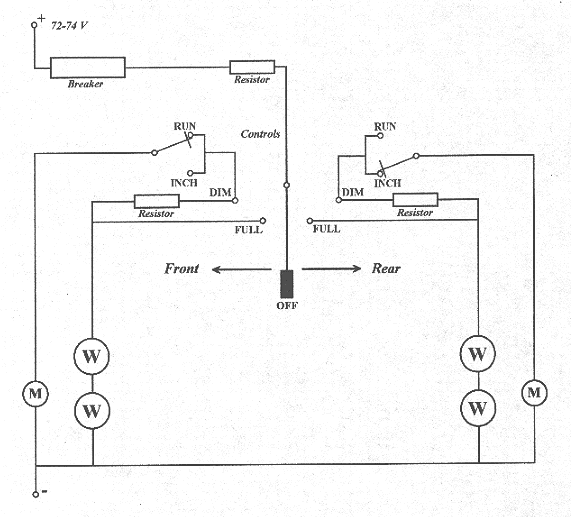
This diagram illustrates a front-rear dual operation light having both bulbs wired in series. A knife switch control (Pyle-National 20385) is used to toggle settings for FULL or DIM on selected oscillating light. It should be noted that the 20385 control switch shows only one switch for the motor control (RUN/INCH), whereas this drawing (redrawn from schematic), shows 2.
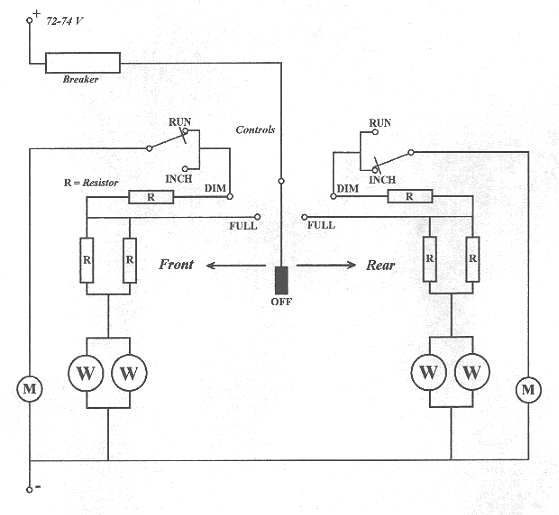
This diagram is a revision of the one above. The 2 bulbs in each oscillating light are wired in parallel. Parallel wiring of the bulbs is desirable for back-up and bulb longevity (see Electrical Aspects page).
This system requires an extra resistor per dual light unit as well as a control that can handle 2x the current. The dimming resistor must have a sufficient wattage rating and the wire must be of a gauge to handle the increased current.
A data sheet on the 20380 control (Pyle-National Bulletin No. 5015, Page A-16) states that switch ratings for the selector control are 30A, 250V and for the motor control are 20A, 24V. The "24V" for the motor control is most likely a typo error. The amperage rating is the maximum current that the contacts are good for to avoid melting, and the voltage rating is the maximum voltage to be switched - to prevent arc over from contact to contact. Therefore, the rating on the motor control has to be designed for a voltage of at least 74 volts (plus a safety factor). It would seem that the 20385 should be equal to the ratings of the 20380.
The Gyralite switch (used on
later EMD and GE stuff) is made by Electroswitch.
It is a Series 101. The EMD headlight switch is also made by Electroswitch. It
is Series 103. The difference is:
Size:
The 101 is a smaller switch series.
Ratings:
101 = 10A @ 125VDC Resistive Load
103 = 30A @ 125VDC Resistive Load
The 101 series is used the on the
control stands. EMD and GE were using them from the 1960's and on.
Bill Kaufman
It can be seen that using 2 200W 30V bulbs in parallel (which draw a total of 14 amps continuous), would be no match for the Series 101 switch. Utilization of a headlight switch (103) would be a way to achieve parallel wiring if the Pyle-National controls are not available.
One thing to notice in the diagrams above is that the dimming resistor is in series with the motor on the FULL setting. The resistor is listed on one schematic as a maximum value of 4.5 ohms. This resistor is tapped for the desired voltage drop on the bulb. A motor current draw of 1 amp would drop at most 4.5 volts, so with a 72-74 volt motor, the drop is negligible.

This is a diagram of the Mars 301 Light with both bulbs wired in series. The current through the bulbs passes through a relay coil which causes completion of current to the motor. The design of this light will prevent the motor from running if either bulb burns out.
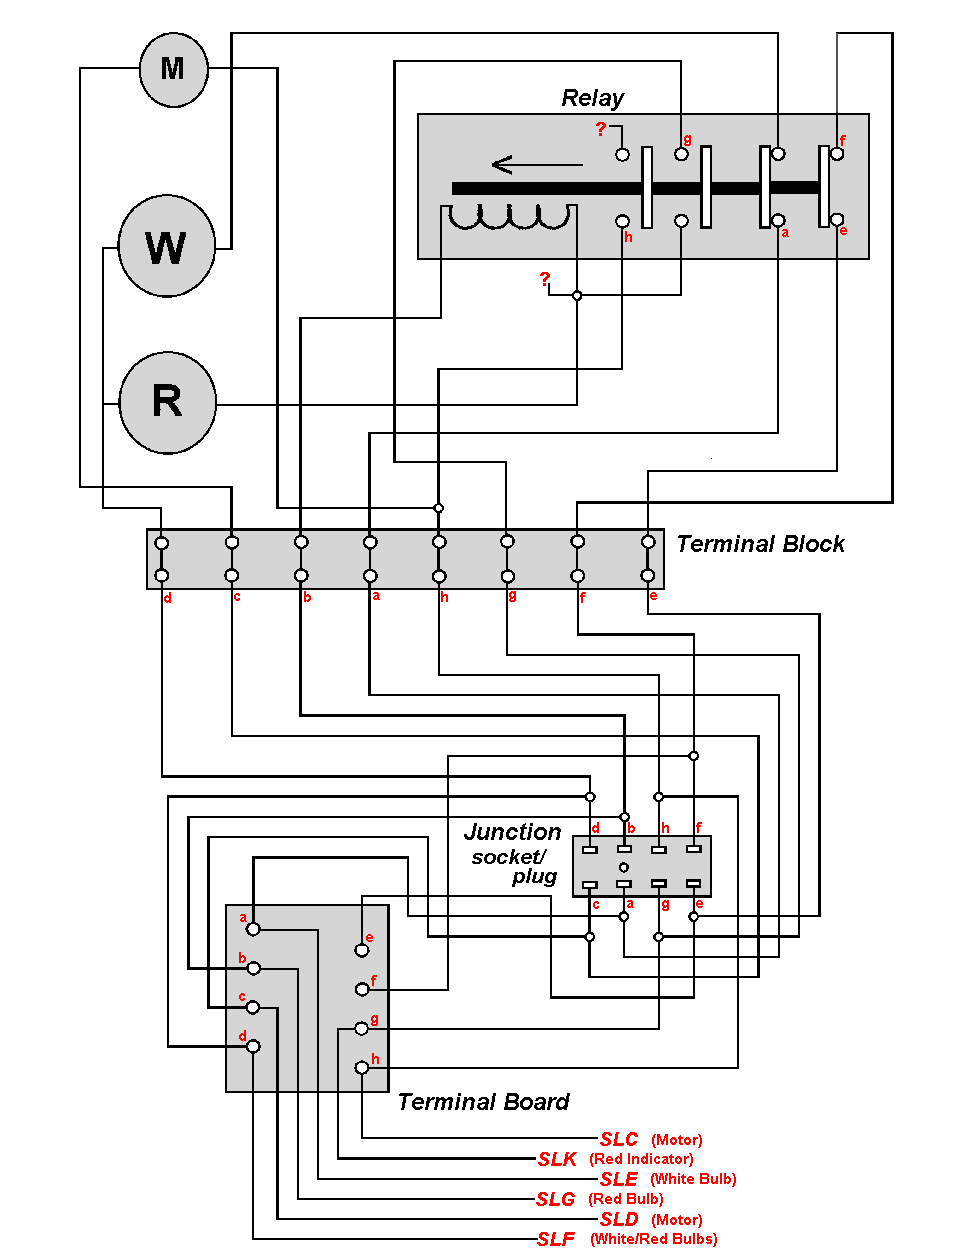
This is a diagram of the Mars 301 Light with a White (Clear) and Red signal. This light came off the former Chicago Great Western No. 403 SD-40 built in 1966 and subsequently became Chicago NorthWestern No. 923. see Mars photo page The back of this light has a Mars tag (SB-WR-2-300 and a serial number of 2052) affixed. It should be noted that this is a flanged light unit (Mars 301). The mechanisms for the 300 and 301 were interchangeable, however.
The wiring diagram was made up from examination of the mechanism. There were 6 wires going into the light all prefixed with "SL" for "Signal Light" (ex. SLE). There were 2 wires that were cut on the relay which could not be identified and are labeled as "?". The notation on the relay states that the contacts were rated at 74 volts @ 3 amps DC. The coil is noted as being rated 8 amps. (There are 7 amps of current through the White bulb and a contacts, however.)
The light has both motor leads hooked to the
terminal block independent of relay action. This may have been the latest
revision to the wiring, as there is a wire to the relay terminal (h) that is
common to the motor. The way in which the light functions, as wired, is that on
activation of the Red bulb, the relay is energized and the supply of current to
the White Bulb is cut off. It looks like the relay terminal (g) was used as an
indicator (light on control) to indicate that there was continuity through the
relay coil and the Red bulb filament. It also would indicate that the relay is
mechanically functional. The unused contacts (e & f) could have been used
to turn off the locomotive headlight. These contacts open on energization of
the Red bulb. The relay contacts are shown to be 3 amps. There may have been a
relay package available that had contacts that could amply handle the current
of the bulbs.

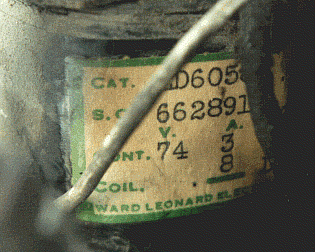
data on relay:
CAT.: ED60584
S.O.: 6628912
CONT.: 74V 3A DC
COIL: 8A DC

Relay showing contacts that would switch on the motor and turn on the indicator
bulb in the cab during application of current to the Red bulb.
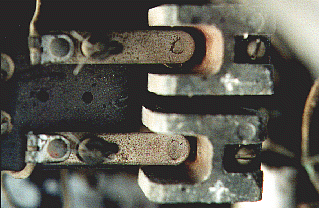
Relay showing shielded contacts (asbestos?). One set maintains current through
the White (Clear) Bulb during normal operation of the light. During an
emergency condition (Red bulb ON), the current through the White (Clear) bulb
is interrupted. The other contact could have been used to maintain current flow
to the headlights. Again, on activation of the Red bulb, current would be
interrupted to the headlights as well. Wiring evidence indicates that this set
of contacts was not used in the latest runs of the CNW 923.