


|
This is a handy way to limit the line tension pull from a kite, and to make them self-adjusting for a variety of wind speeds. It helps prevent kites from crashing or flying into the ground during gusts. It works with kites that have 2 strings in-line on the bridle, such as deltas and diamonds (not that I like a diamond for anything but a space to hold a pretty picture, to me its not a stable KAP camera kite).
It even works on a Rokkaku (so long as the bridle is long enough at the beginning to have 2 strings for the leading and trailing spars, before it goes to the 4 strings.) |
|
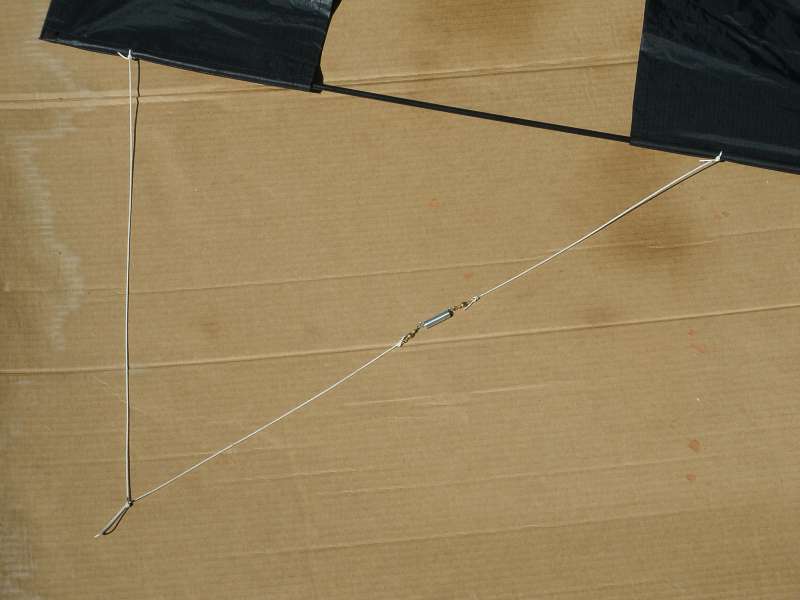
The simplest way is to put a spring in the trailing line. I like a spring that has closed loop ends, so a string knot or attachment doesn't slip off. And it is close-wound, so it has some initial tension keeping it compressed. I like to use swivels, not because of their swivel action but because it is easy to attach the springs to the metal loops. I can easily snap in a different spring when I want to experiment. |

|
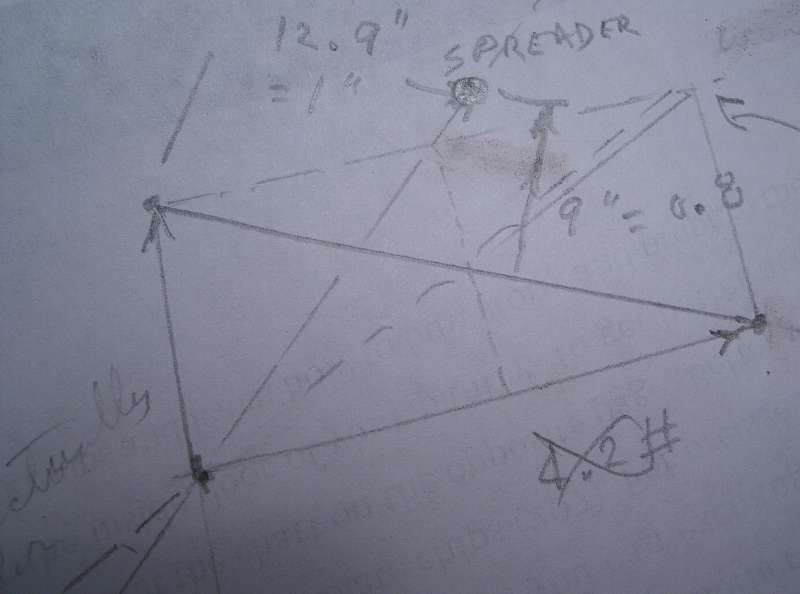
Most springs with a spring rate under 1 lb per inch (medium-to-low stretch rate) don't have a very high minimum pull before they start moving. I want the kite to generate some useful pull before the spring stretches and decreases the kite's angle of attack in the wind. I expect my kites to do some work. But not too much. I have an 80-inch Rok that can pull like a mule, but I don't need that much to lift a little camera. If I knew when the gusts come or what the wind was at altitude, I could bring the kite down and adjust the bridle and launch it again. That's a waste of time, the wind can change a lot before I can get it back up. Also keep in mind that many kites have a maximum stable wind speed. The spring can save you time adjusting a bridle and operating close to the top end of the range, but you won't be able to exceed that maximum. Here's a rough scaled sketch of strings on a delta conyne kite. I want to know the direction or angle of the strings, and it helps if you can predict the angle of the kite string and if it lines up with the main spreader spar, where the load is centered on the kite. (this can be hard to calculate on complicated kites) |
|
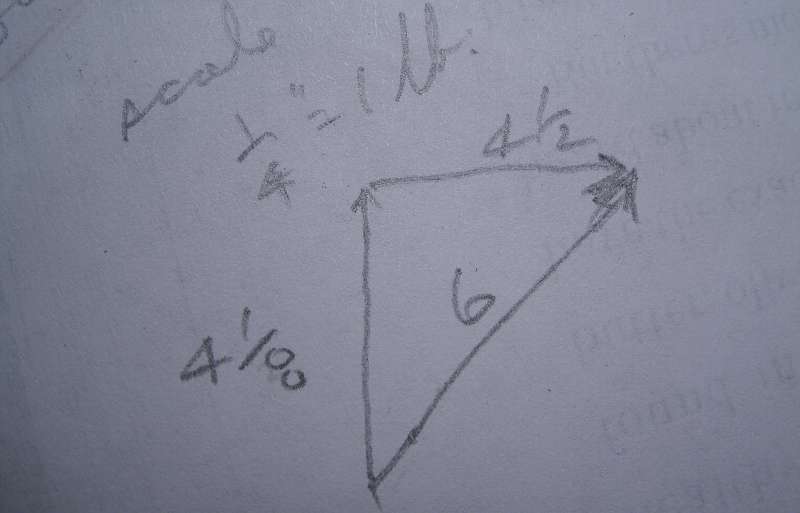
The forces pull in the direction of the strings, and they are not in proportion to the length of string. Here's a force diagram of the line tension I want. I started with 6 lbs that I wanted to feel at my reel on the ground, but actually I set my spring for less. As we'll see, I started with 2lbs and as the spring stretched to do its job, the string tension made it to 6 during a gust. In this example and for these string angles, if I want 6 lbs on the line, the forward bridle string should see 4-1/8 lbs, and the rear should see 4-1/2. |
|
So I want the rear string to give slack if the pull gets higher than 4-1/2 lbs. I want to change the angle of attack and decrease the pull and re-balance the force diagram when the wind gusts.
If the spring is very stiff and doesn't move at least three inches for a 4-foot long kite, then the slacking effect might not be enough to really tame a kite in a gusty wind. That's why I like spring rates of under 1 lb per inch.
To get the minimum tension that I want on the kite string, I pre-load the spring. I don't want it to change its length until the load exceeds that setting. If I don't pre-load, a simple spring starts getting longer after the first 1/4 lb of pull and releases some pull before the kite can lift my camera load. The kite might lift, but with very little to spare. Here's the parts before I put the dowel inside of the spring. The short dowel is a way to add some more tension in addition to the main dowel, if I want to increase the tension in the field. I can add it end-to-end with the other dowel inside. |

|
Test it by pulling the spring longer by 4 inches, the dowel should slide freely inside the spring. Then let go of the spring's ends, the dowel should stay inside. Smooth a little chamfer on the corners of the ends of the dowel, we don't want it to snag inside the spring and hold it stretched longer than planned. Otherwise, after a gust, the spring might stay long and the kite's angle wouldn't come back to normal; then when the wind fades to normal ,the kite would come down faster than expected. And below, it is assembled and tied into the trailing string. The dowel is trying to squeeze out of the left end, but it is still stopped by the wire and won't fall out. You might be able to re-bend the end loop of spring wire to make it bump better against the end of the dowel. The fine thread is a 'proofing line' that indicates how much the spring flexed during the flight. It is mostly for my experiments. It has a slip knot on one end, and I push the little slip knot tight the the right before launching. When I get the kite back, I look at how much slack was pulled or slipped. The slip knot usually moves about 2 to 3 inches after I test a kite in gusty winds. I also record average and maximum winds on a wind meter attached to the line below the kite and make comparisons with the spring movement for the testing. |

|
I flew two delta conynes, of different sizes, with good results. The 1-1/2 lb pre-loaded spring gave a 2-1/2 to 3 lb line pull during an average wind of 11-14 mph. At the same time as lifting a test weight of a 1-lb water bottle which is 3 ounces heavier than my camera rig. During gusts, I also ran into the wind to increase the apparent wind speed to really test it. The meter recorded 25 mph, and the line pull was about 6 lbs. And the kite was flying fairly level yet. I know that kite would have turned over and circled and threatened to 'fly to the ground' at that wind speed if it didn't have the spring. The string pull seemed reasonable. The spring rate was 0.8 lbs per inch and the 'proofing line' showed the spring extended 3 inches during the flight; 3 inches x 0.8 lbs/inch = 2.4 lbs
on the spring and I also have to add in the initial pre-load on the spring of 1-1/2, so the total comes up to 3.9 lbs on the spring during the strong wind. The force diagram predicted 6 lbs of line pull and over 4 lbs at the spring. Close enough, considering the kite's angle of attack is hard to predict during a gust. The mathematics of the spring takes care of some of those unkowns. The excess pull is less during gusts when I used a springier spring, with a spring rate under 1/2 lb per inch of stretch. I have one spring that is 4-1/2 inches long and is so flexible that I need about 12 inches of wood dowel to pre-load it to 1-1/4 lbs. That's a longer dowel than the spring shown in my picture. Do test your spring and dowel by hand before flying. Pull it 4 inches longer than what you started with. It must return to shape. My dowel method might pull a spring longer than reccommended by the manufacturer. I haven't had one yield and stretch permanently yet. You could see what happens if it stretches permanently, or if the coiled end wants to unwind and the knot come off.
Here's a disadvantage witth the spring. Its harder to 'pump' a kite up by jerking the line to make the kite change shape and angle to bite into the wind. The spring will compensate and reduce the load. I also tried a spring on my 80-inch Rok and didn't even put a dowel in it to pre-load it, and did fairly well on a photo expedition. The kite flew stable like Roks do, and then a gust came along which 'bent' it into a extreme hourglass shape and the fabric bowed near the lower spreader. That's the condition that makes a Rok pull like a mule. And in about a second, the fabric changed to normal and the kite settled down to a reasonable pull. In 2 minutes the gust went away, and the camera didn't change altitude by a 100 feet. Usually during thermals, that Rok can pull a line tight and up high. With the spring, the angle between me and the camera was about 45 degrees most of the time. The camera was hanging almost straight under the kite, within 10 degrees. That's the position it usually takes on days when the wind is light with just enough power to lift a camera. Like an instrument package under a weather balloon. And that position is usually the most steady so the camera is stable for good pictures. If you have a small flying field and need extreme angles on the string to stay away from trees or obstacles, then you might want to tie down the spring so it can't move and then fly the kite like normal. And hope the wind doesn't die, nothing can make wind unless you have a big fast reel. The spring and dowel weigh 2 ounces, so that will reduce the kite's lifting load a little. But I make up for it by setting the string attachment at the bridle for the low wind setting to generate a lot of pull. |
|
Instead of a steel spring, you could use a rubber bungee cord or silicone rubber tubing. I like the steel, it is mathematically predictable and shouldn't change its properties over time and temperature, compared to rubber. I expect the kite and spring to come out of storage and be as strong as before.
To fine-tune the spring and bridle, you could change the bridle lengths to change the angles. Although, some kites have such long bridles that it can be a handful to launch.
I have used some no-name springs from a variety pack, but now I like to use springs that have consistent specifications. Lots of springs are available by mail order, but the local hardware store has only a few on their shelves. I like the Century Spring C-193, 4 inches long, 3/8 diameter, 0.034 wire. The C-211 is similar but much more springy, I have tried that on my smaller kite that I use in strong winds over 15 mph or if it is gusty. Springy springs are theoretically useful. I want the spring to hold my pre-load, and then not increase that load as it stretches more when the wind increases. Springs don't work that way, they get tighter as they stretch, so the next best thing is a low spring rate. |
|
If I flew kites just for the fun of it, I could leave well enough alone and just use a simple spring to tame my kite so it would survive some gusts. It could have a boringly simple flight. Some people like their kites to dance and flutter (and crash), and kite manufactuers wouldn't care for the extra expense of adding a spring just to tame a kite. Some people like 'exciting' kites. (I call them frustrating kites) Instead, the flyer is supposed to watch the weather, adjsut the kite, or not fly. Now that I've gotten past the experimental stage with springs, I will use them to make the kite to do what I want to, its a 'skyhook' for KAP (kite aerial photography). The kite survives wind conditions when I normally wouldn't fly. It is assuring to know it works because sometimes I am a long way from home and won't be back and either have to try aerial photography or go home wondering if would have been ok. When in doubt, I send up an appropriate little kite to see what the wind is doing up there. And the spring helps get past variable winds in case something unseen comes up. You can watch the local Wunderground weather stations for actual winds after they occurr, but the kite flyer knows what the local wind is, right now. (put up a kite INside an occluded front sometime and see how interesting it gets)
Kite string tension limiting is useful, it saves a lot of cranking power on a reel, and the line doesn't bite into itself as it rolls up.
It is interesting to watch a kite in a choppy wind, if it is close enough to the ground to see the spring action well. Its also good for kites for kids. Adding just a simple spring on a little kite can tame variable wind conditions for them. It keeps things from getting frustrating because kites that threaten to roll and crash or fly into the ground is not good. |
This page was written in September, 2014, and moved to the 1App page when it replaced the nexGen free site
and then that 1app page disappeared, so now I put it on my trainweb pages in 2019, which should be more dependable.


